


Add Wemos D1 Mini To Arduino IDE And Connect To WiFi
Содержание
The Wemos D1 Mini is a must-have for any maker due to its versatility and low cost. You can make a WiFi temperature sensor for your smart home for the cost of a beer!
If you want to build a device for your smart home, or add smart functionality to an existing device without hours of coding then you should definitely check out Tasmota.
However what if we want to develop our own application from the ground up? One of the easiest ways to develop an app for the D1 Mini is to use the Arduino ecosphere.
In this tutorial we will learn how to add support for ESP devices to the Arduino IDE so that we can create an application for the Wemos D1 Mini.
Rather than end the tutorial with the ubiquitous and somewhat boring “blink” example, we take it one step further and write a very simple application to connect to the WiFi!
Prerequisite
You will of course need a Wemos D1 Mini board, USB cable and a Mac/Linux/Windows machine to connect it to. Experience with Arduino is advantageous but not essential.
I found that the board would communicate with Mac OS using the built-in driver. However if you need a driver, SparkFun have a useful resource providing downloads for every operating system.
Setup the Arduino IDE
First we will need to download and install the latest version of the Arduino IDE. The Wemos D1 Mini uses the ESP8266 so once we have the IDE we can add the supporting ESP packages.
Install the latest version of Arduino
You can download the latest version of the Arduino IDE from the website if you do not already have it.
Mac and Windows systems have typical installation options. Linux users may benefit from this additional information on the Arduino website.
Add the ESP board manager
Once you have installed the Arduino IDE, open it up and click on preferences.
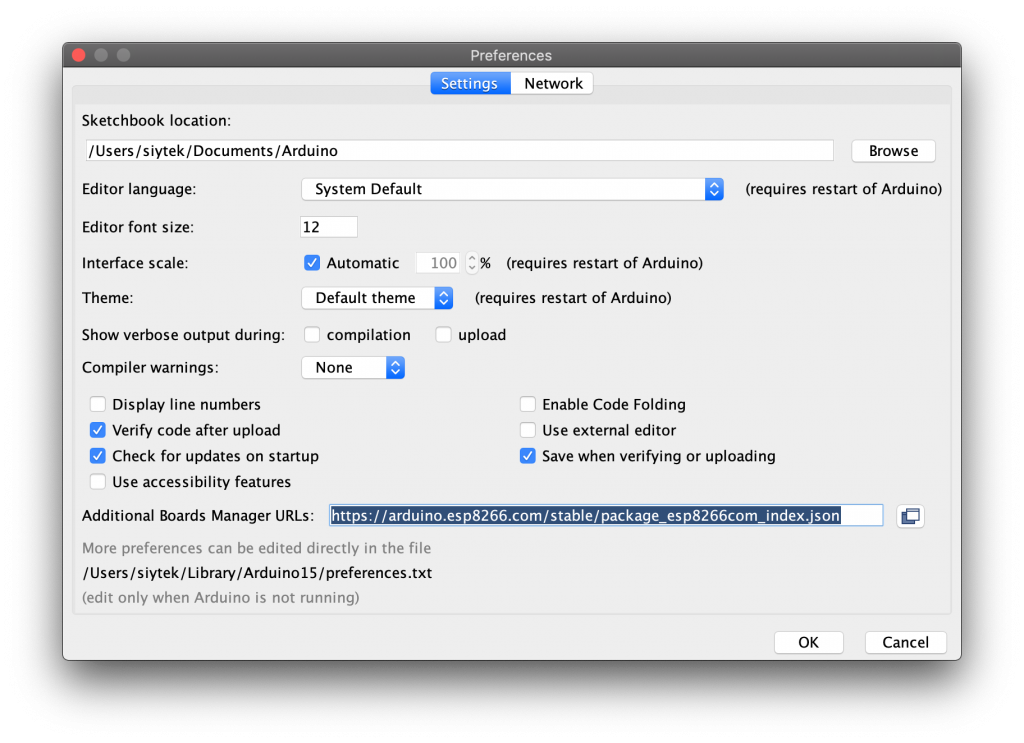
We will need to add the ESP board manager URL. Enter the following into the additional board manager URLs text box.
If you need to use multiple board managers, you can click the small icon to the right of the text box and enter multiple URLs.
Add the ESP boards
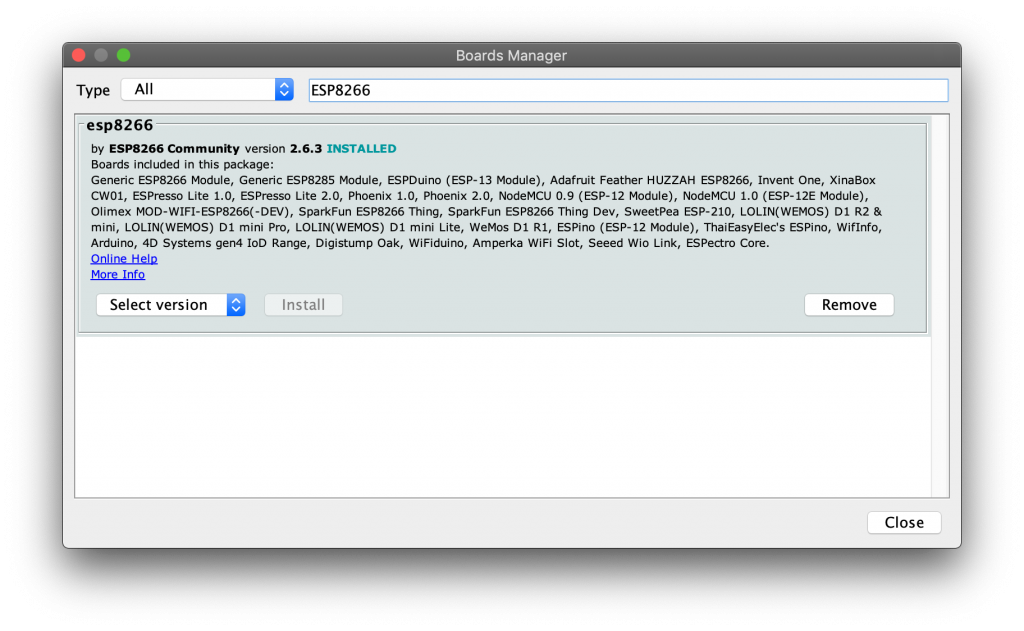
Now we can add the ESP boards by clicking the tools > board > boards manager… option on the menu. 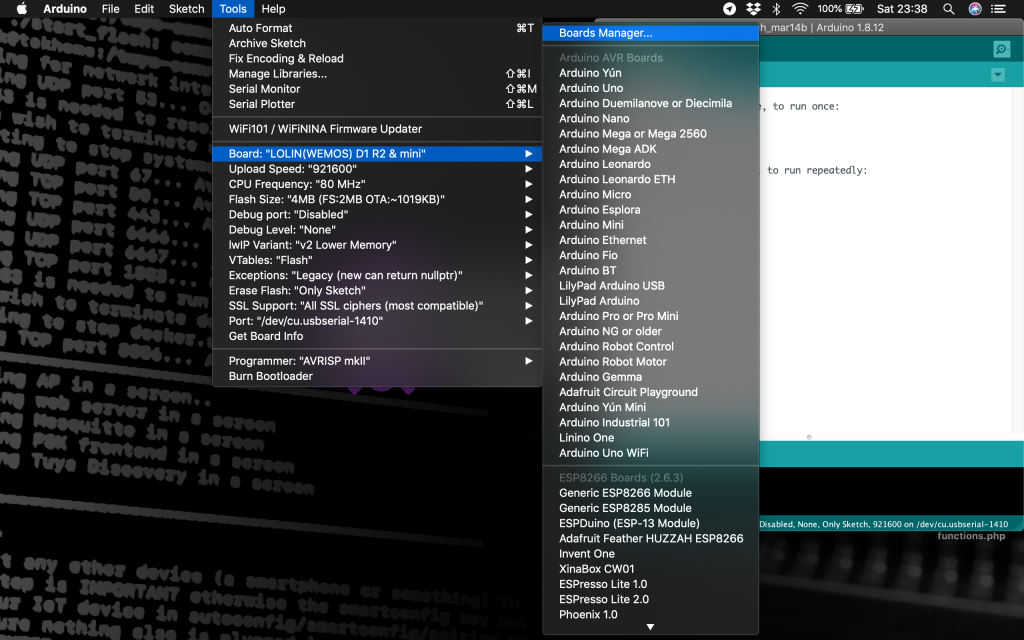
Search for the ES8266 package and install it. Once it has installed you can close the boards manager.
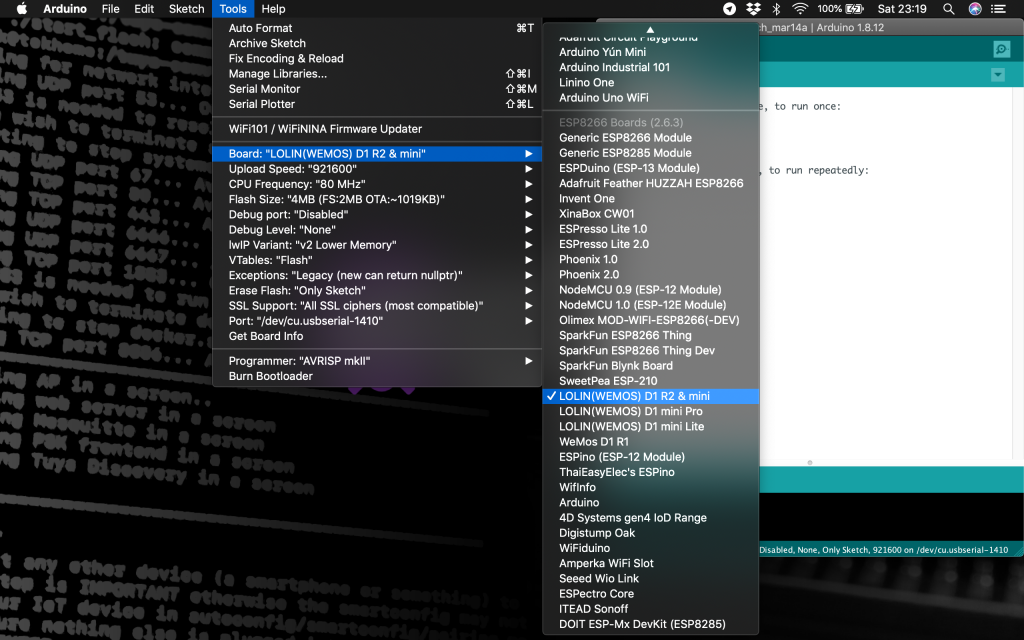
Choose the board and port
Next we need to select the Wemos D1 Mini board from the tools menu. We will need to select LOLIN(WEMOS) D1 R2 & mini from the newly added ESP devices.
Finally we need to choose the correct port from the tools menu. On Mac/Linux this will appear as something like dev/cu.usbserial-xxxx and on Windows it will be COMX. 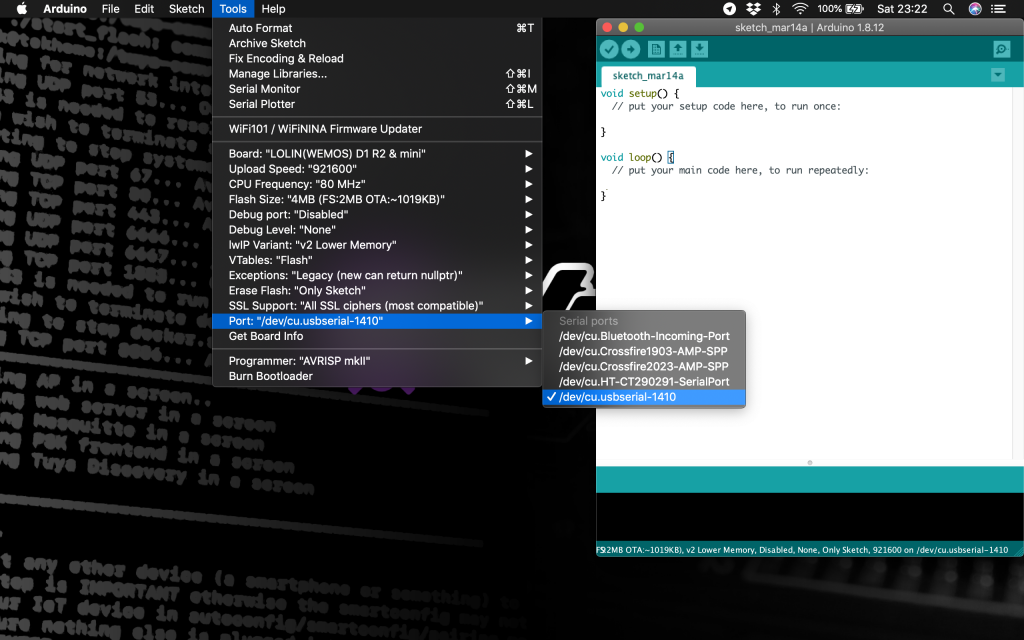
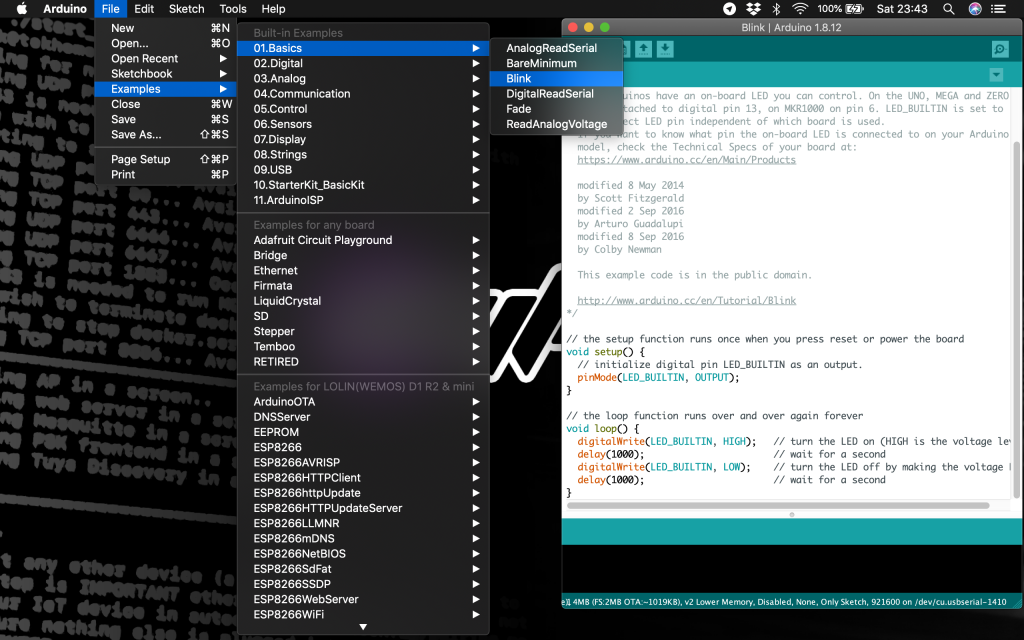
Load Blink to test
Let’s give the blink example a quick try just to make sure everything is configured correctly. Click file > examples > 01 basics > blink to load the sketch.

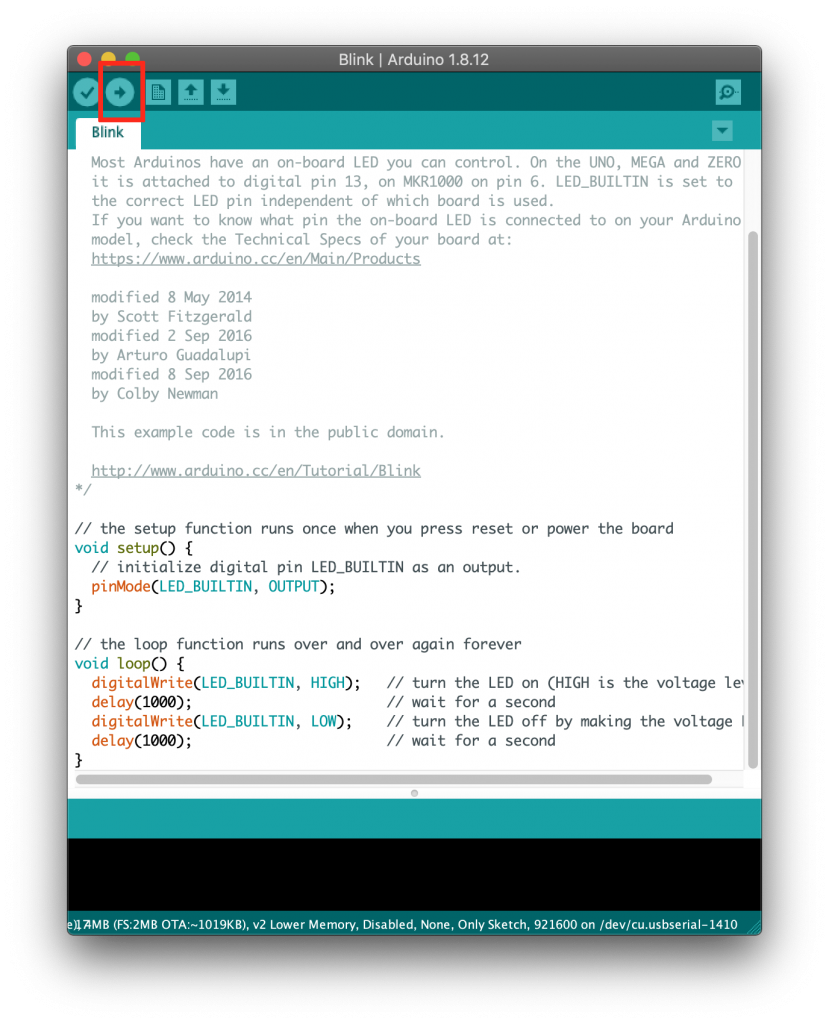
Once the sketch has opened, click the upload sketch button and wait a moment for the sketch to upload. If everything has been sucessful the LED on the Wemos D1 Mini should blink slowly.
Connect to WiFi
It is probably safe to assume that you will be wanting to connect your board to WiFi as a top priority. This is afterall one of the most powerful functions of the board!
So rather than stop at the blink sketch like most tutorials, let’s dive right in and connect the board to WiFi!
Include WiFi library
The first thing that we need to do is create a new sketch and then add the include for the ESP8266WiFi library. We will also define the SSID and password, be sure to change the values inside the quotes for your WiFi credentials.
Setup serial
Next we will open the serial port so that we can receive a message in the serial window which tells us when the WiFi has been connected successfully.
Setup WiFi
Now we can add the command to begin the WiFi. We will use the values for SSID and password declared earlier so make sure you set them correctly for your network.
Wait for a connection
Next we will add some code that prints a message to the serial window to let us know that the ESP is trying to connect to the network.
We also need to add a while loop that iterates while the WiFi is not connected. This will prevent the program from continuing until a connection is established.
Print IP address
Finally we can add an output to the serial window which prints the assigned IP address once a connection is established.
Testing the WiFi connection
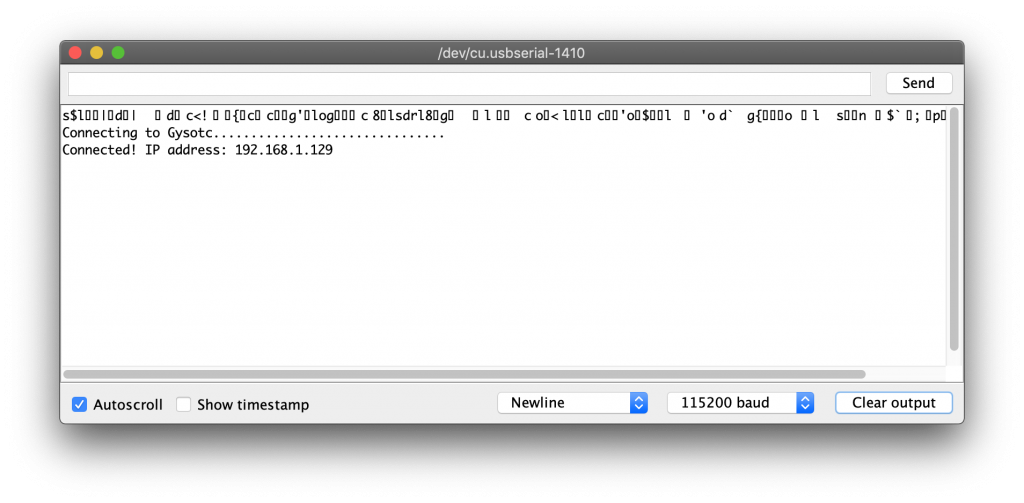
Now that the code is complete we can go ahead and test our WiFi connection! First upload the sketch and then open the serial window once it has complete. Don’t forget to change the baud rate to 115200 to match the program.
Then press the reset button on the side of the D1 Mini and you should see an output like this. If the connection was successful, the IP address will be printed in the serial window.
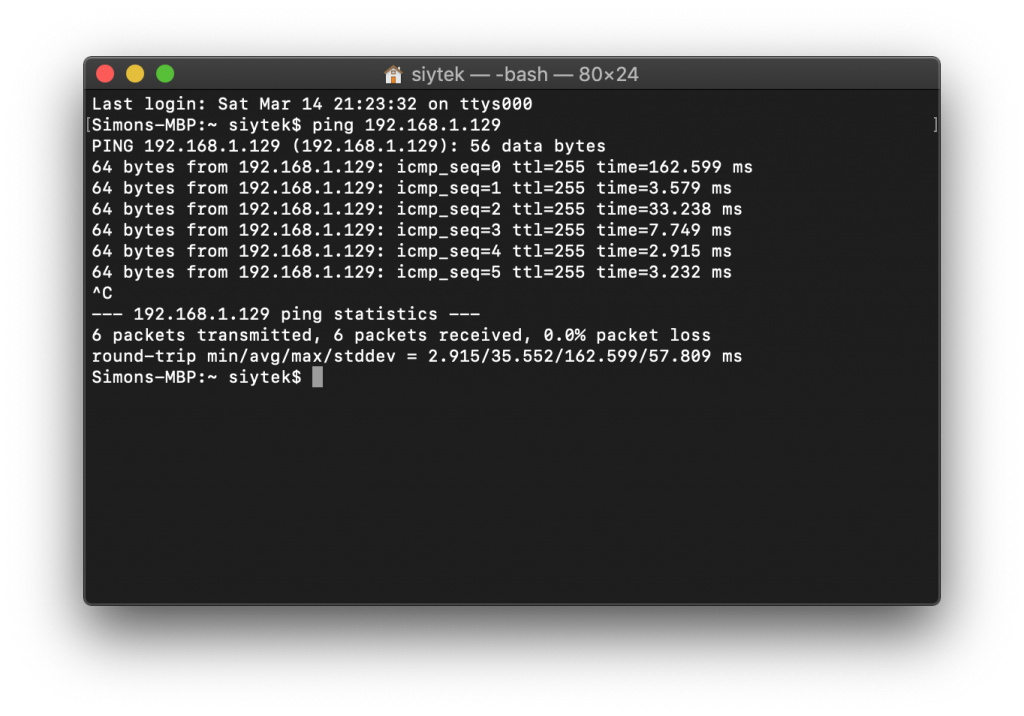
Awesome! Now if we open a terminal window/command prompt and use the ping command, we can check that the D1 Mini is active on the network.
The ping command sends data packets which are bounced back by the D1 Mini. We can see that the connection is successful and also the round trip time of the data.
Conclusion
The Wemos D1 Mini is a very powerful and cost effective tool for any maker, smart home enthusiast or Tek lover.
Although there are some fantastic solutions available that allow many projects to be built without code, it is great to have a way to build an application from scratch.
Arduino provides the perfect platform to develop custom apps for the Wemos D1 Mini and now you should be set up and ready to create your own!
So next you want to be able to upload your sketch over WiFi? Go ahead and check out my tutorial on how to flash devices over the air (OTA) using the Arduino IDE!
Источник: