


Introduction
Содержание
- Preparations
- Hardware
- Software
- About RTC DS3231 Module
- What is RTC DS3231?
- Specifications
- How Does it Work?
- Pinouts
- Schematic
- Examples
- Displaying date and time in the serial monitor
- Demonstration
- Real Time Clock Module, LCD Display and Controller Time
DS3231 is a low-cost, extremely accurate I2C real-time clock (RTC) with an integrated temperature-compensated crystal oscillator (TCXO) and crystal. The device incorporates a battery input, and maintains accurate timekeeping when main power to the device is interrupted.
In this leeson, we will show what the DS3231 RTC module is, how it works and how to use it to make a simple project with the Osoyoo Uno board. If your sensor later loses connection with controller or power cycles it can pick up time from the local RTC. The module uses a CR2032 battery for time backup which should last for about 3-4 years.

Preparations
Hardware
- Osoyoo UNO Board (Fully compatible with Arduino UNO rev.3) x 1
- RTC DS3231 Module x 1
- Jumpers
- USB Cable x 1
- PC x 1
Software
About RTC DS3231 Module
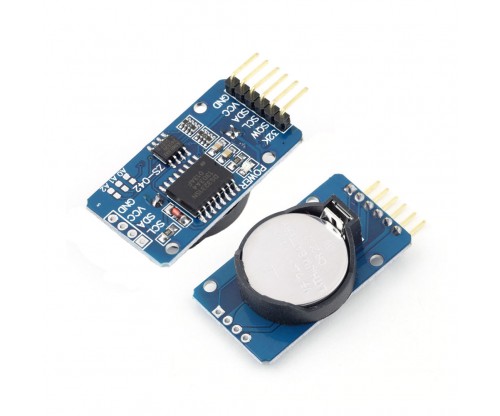
What is RTC DS3231?
The DS3231 is a low-cost, highly accurate Real Time Clock which can maintain hours, minutes and seconds, as well as, day, month and year information. Also, it has automatic compensation for leap-years and for months with fewer than 31 days.
The module can work on either 3.3 or 5 V which makes it suitable for many development platforms or microcontrollers. The battery input is 3V and a typical CR2032 3V battery can power the module and maintain the information for more than a year.
Specifications
- Highly Accurate RTC Completely Manages All Timekeeping Functions
- Real-Time Clock Counts Seconds, Minutes, Hours, Date of the Month, Month, Day of the Week, and Year, with Leap-Year Compensation Valid Up to 2100
- Accuracy ±2ppm from 0°C to +40°C
- Accuracy ±3.5ppm from -40°C to +85°C
- Digital Temp Sensor Output: ±3°C Accuracy
- Two Time-of-Day Alarms
- Programmable Square-Wave Output Signal
- Simple Serial Interface Connects to Most Microcontrollers
- Fast (400kHz) I2C Interface
- Battery-Backup Input for Continuous Timekeeping
- Low Power Operation Extends Battery-Backup Run Time
- 3.3V Operation
How Does it Work?
The DS3231 real time clock module keeps track of the time even when the module is not powered. It has a built-in 3V battery which keeps updating the time. We will get the time and date from the RTC module using the library functions and then we will compare this time with the alarm time that we have set in the code.
Most RTC’s use an external 32kHz timing crystal that is used to keep time with low current draw. And that’s all well and good, but those crystals have slight drift, particularly when the temperature changes (the temperature changes the oscillation frequency very very very slightly but it does add up!) This RTC is in a beefy package because the crystal is inside the chip! And right next to the integrated crystal is a temperature sensor. That sensor compensates for the frequency changes by adding or removing clock ticks so that the timekeeping stays on schedule.
Pinouts
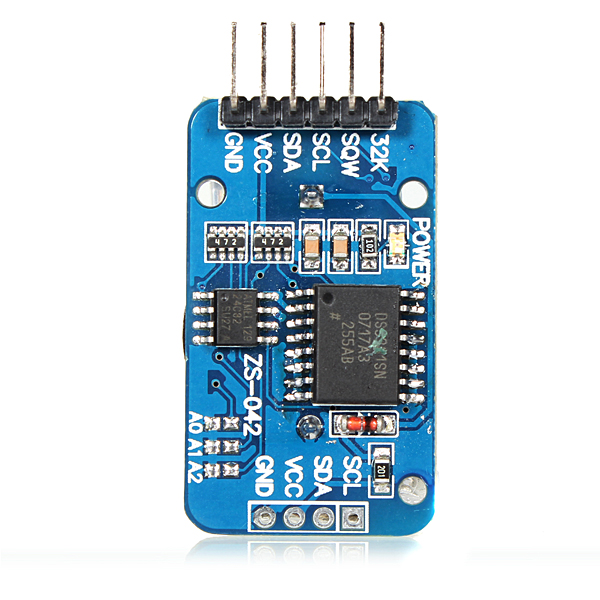
Power Pins:
- VCC this is the power pin. Since the RTC can be powered from 2.3V to 5.5V power, you do not need a regulator or level shifter for 3.3V or 5V logic/power. To power the board, give it the same power as the logic level of your microcontroller e.g. for a 5V micro like Arduino, use 5V
- GND common ground for power and logic
I2C Logic pins:
- SCL I2C clock pin, connect to your microcontrollers I2C clock line. This pin has a 10K pullup resistor to Vin
- SDA I2C data pin, connect to your microcontrollers I2C data line. This pin has a 10K pullup resistor to Vin
Other Pins:
- 32K 32KHz oscillator output. Open drain, you need to attach a pullup to read this signal from a microcontroller pin
- SQW optional square wave or interrupt output. Open drain, you need to attach a pullup to read this signal from a microcontroller pin
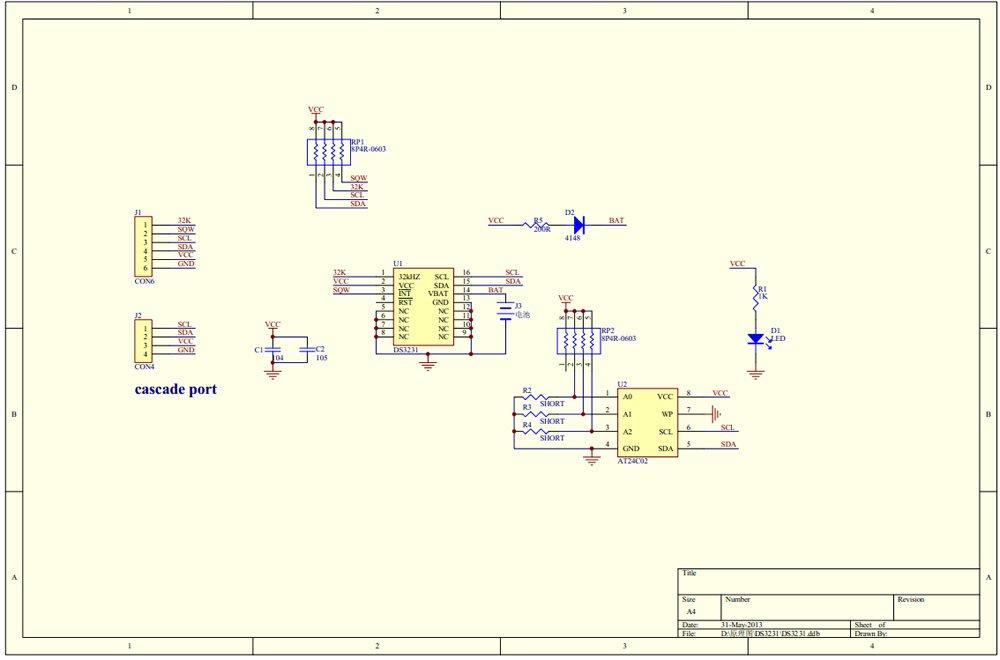
Schematic
Examples
Displaying date and time in the serial monitor
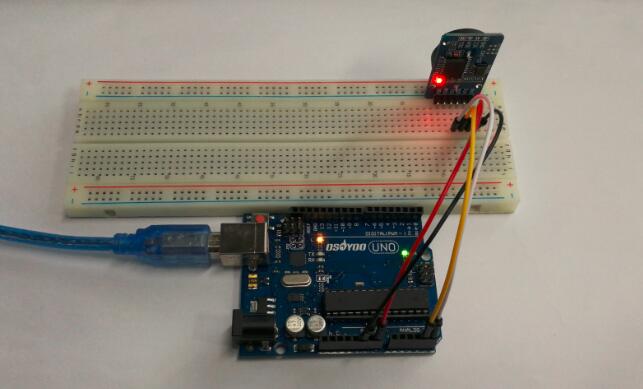
Connection
Pin Wiring
Wiring the RTC module is pretty straightforward!
| Pin | Wiring to Arduino Uno |
| SCL | A5 |
| SDA | A4 |
| VCC | 5V |
| GND | GND |
If you’re using other Arduino board rather than the uno, chek out what are their SCL and SDA pins.
- Nano: SDA (A4); SCL(A5)
- MEGA: SDA (20); SCL(21)
- Leonardo: SDA (20); SCL(21)
Build the circuit as below:

Code Program
After above operations are completed, connect the Arduino board to your computer using the USB cable. The green power LED (labelled PWR) should go on.Open the Arduino IDE and choose corresponding board type and port type for you project.
We will use a library from Henning Karlsen which is great. Thanks a lot for that! There are some basic functions such as reading time and date and writing time and date. Download the library here.
Working with the RTC requires two important steps:
- setting the current time, so that the RTC knows what time is it
- retaining the time, so that the RTC always gives the correct time, even when it is turned off
Set the current time in the Real Time Clock
For setting the current time you need to change the code provided.
- set your current time int the function setDS3231time()

The parameters for the function are highlighted in red: seconds, minutes, hours, day of the week, date, month and year (in this order). Sunday is the day 1 of the week and Saturday is 7. Don’t forget to uncomment that line of code.
After setting the current time, you can upload the provided code with the required modifications.
The code provided was written by John Boxall from tronixstuff. You can read his tutorial here.
Retain the time in the Real Time Clock
If you don’t want to reset the time everytime the RTC is turned off, you should do the following:
- after setting up the time, you should comment the function that sets the time and upload the code again.
This is a very important step to set up the time in your RTC. If you don’t do this, everytime your RTC resets, it will display the time that you’ve set up previously and not the current time.
Demonstration
Open the serial monitor at a baud rate of 9600 and you’ll see the results.
Here’s the Serial Monitor displaying the current date and time.
Real Time Clock Module, LCD Display and Controller Time
This example shows how you can fetch current time from the controller and put it to a battery backed up Real Time Clock (RTC) module attached to your Arduino. We’ve also attached a LCD Display showing time and temperature [coming from the internal temperature sensor in the RTC module].
This example uses the external TimeLib, DS3232RTC and LiquidCrystal_I2C libraries found here. Please install them and restart the Arduino IDE before trying to compile.
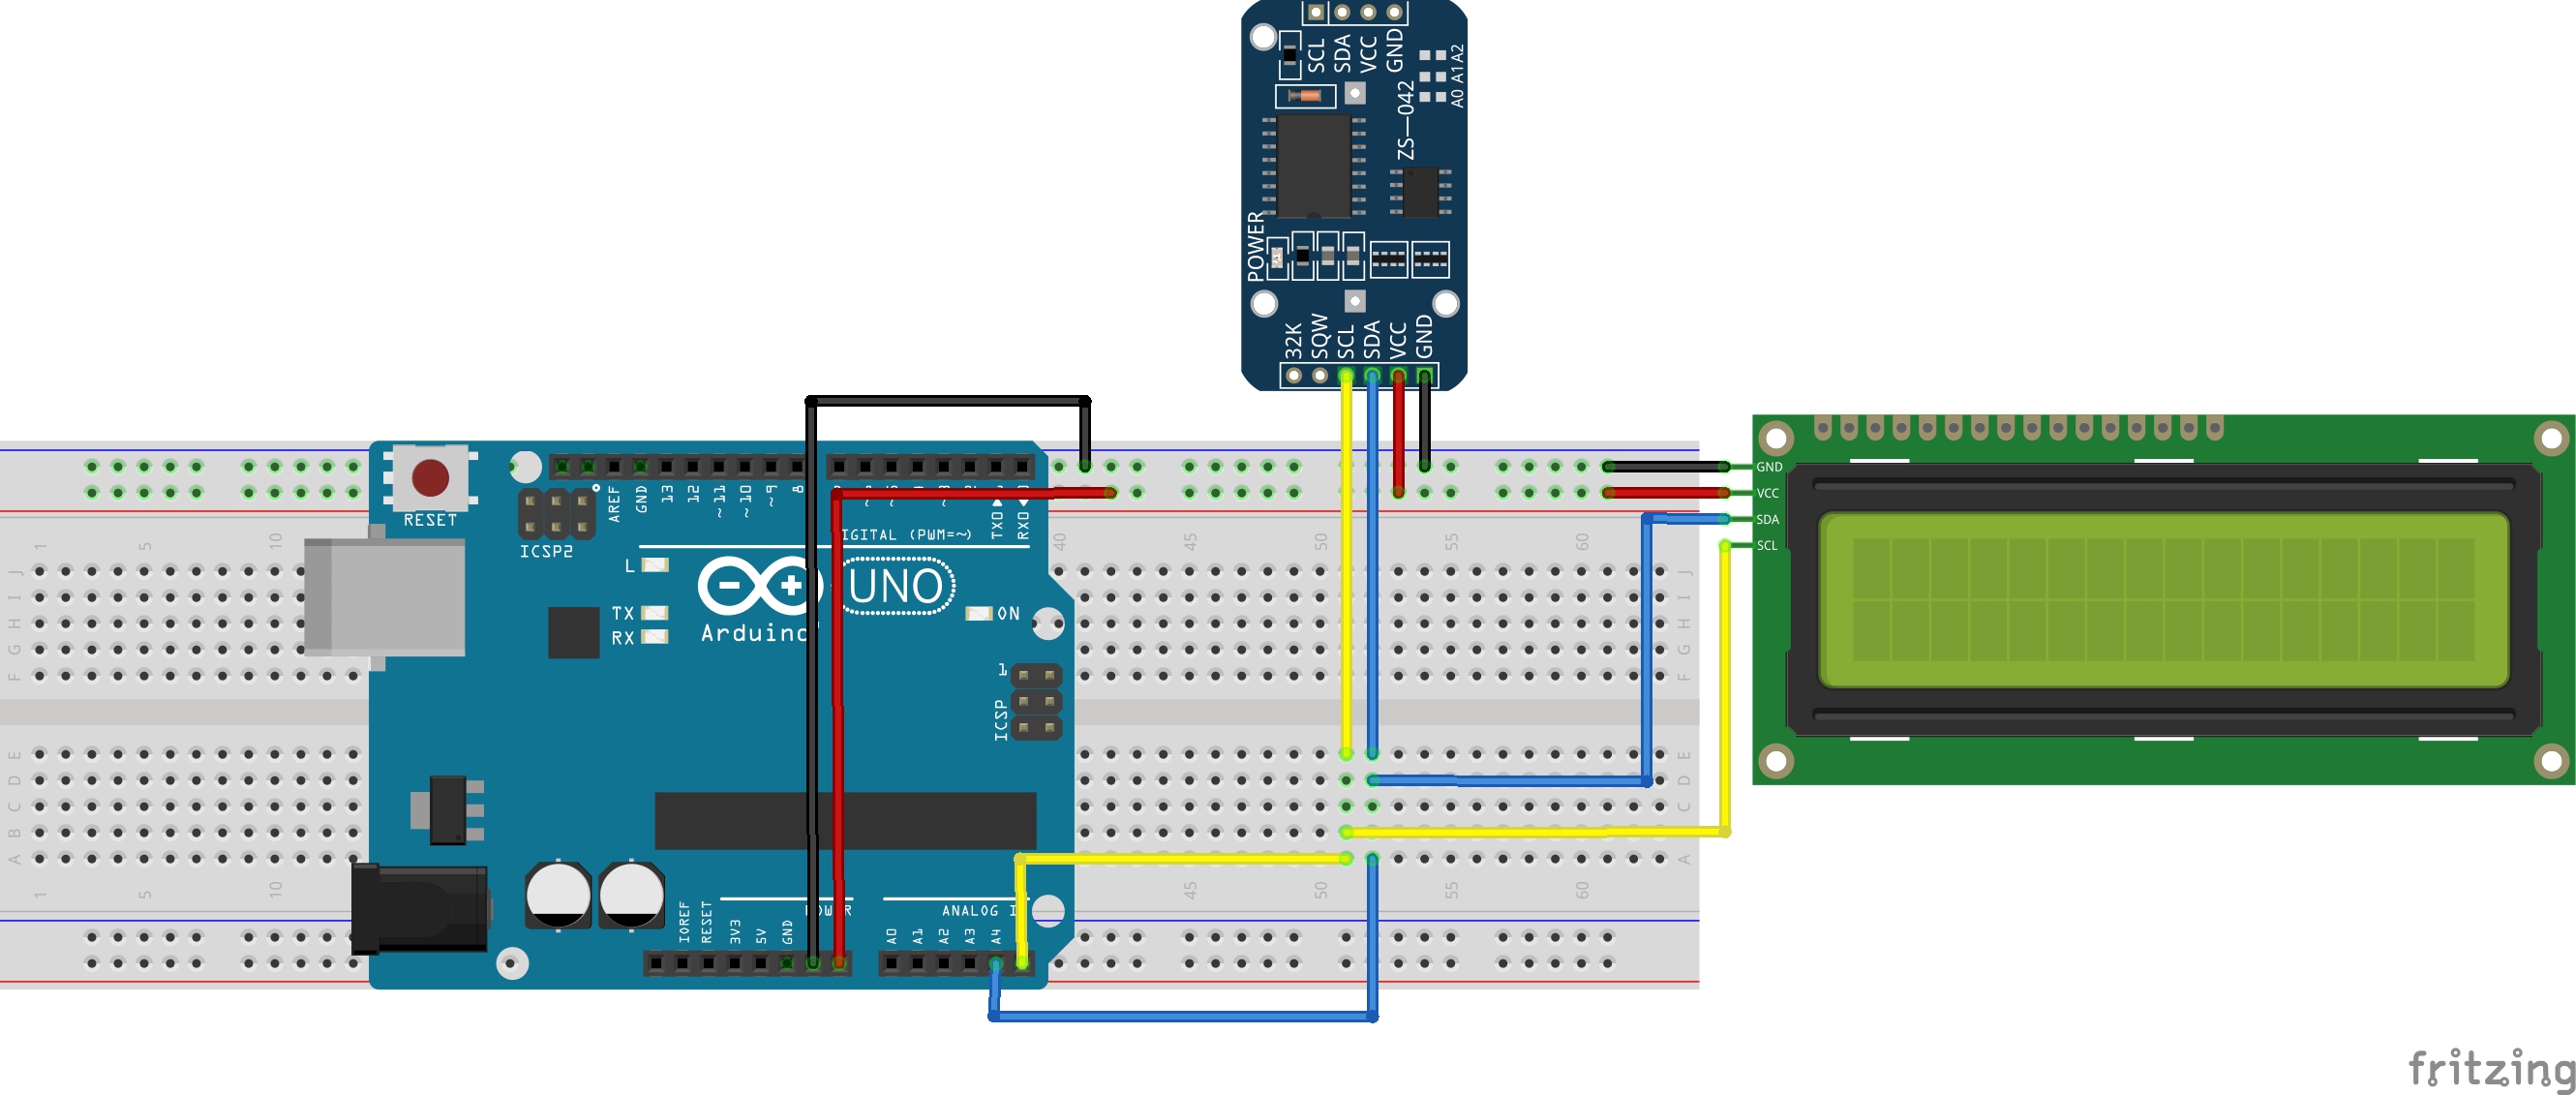
Connection
| RTC Module | LCD Display | Arduino |
|---|---|---|
| VCC | VCC | +5V |
| SDA | SDA | A4 |
| SCL | SCL | A5 |
Code Program
After above operations are completed, connect the Arduino board to your computer using the USB cable. The green power LED (labelled PWR) should go on.Open the Arduino IDE and choose corresponding board type and port type for you project. Copy below code to your Arduino IDE, then load it to your Arduino board.
Running Result
A few seconds after the upload finishes, we can see the running result as below:
Open the Serial Monitor, you can also see the output:
6 Comments
Thanks for this detail tutorial. It helps to understand how it works and how to use RTC applications. I tried with few modification for 12 hours format and removing temperature with simple ‘if-else’. Serial console print can be comment after setting rtc ds3231 and successfully running the code. Also 3 char month name printing on 16×2 lcd. Printing 4 digit year on 16×2 lcd with leading ’20’ is merely showing century and looks good until end of this century 😉
I simply paste here your original code modified in 12 hours format. Kindly revert suggestion.
#include // For the i2c devices
#include // For the LCD
LiquidCrystal_I2C lcd(0x27,16,2); // set the LCD address to 0x27 for a 16 chars and 2 line display
#define DS3231_I2C_ADDRESS 104 // RTC is connected, address is Hex68 (Decimal 104)
// SCL pin A5
// SDA pin A4
// To set the clock, run the sketch and use the serial monitor.
// Enter T1124154091014; the code will read this and set the clock. See the code for full details.
//
byte seconds, minutes, hours, day, date, month, year;
char monthName[4];
char weekDay[4];
//byte tMSB, tLSB;
//float my_temp;
//char my_array[100]; // Character array for printing something.
void setup()
<
Wire.begin();
Serial.begin(9600);
lcd.init(); // initialize the lcd
>
void loop()
<
watchConsole();
get3231Date();
/*Serial.print(weekDay);
Serial.print(“, “);
Serial.print(date, DEC);
Serial.print(“/”);
Serial.print(month, DEC);
Serial.print(“/”);
Serial.print(year, DEC);
Serial.print(” “);
Serial.print(hours, DEC);
Serial.print(“:”);
Serial.print(minutes, DEC);
Serial.print(“:”);
Serial.print(seconds, DEC);
Serial.print(” Temp: “);
Serial.println(my_temp);
*/
// NOTE: Arduino does NOT implement printing floats to a string.
// If you use the std C function : sprintf(my_array, “Temp: %4.2f”, my_temp), It will NOT CONVERT.
// So I abandoned this, since I don’t need to print the float to the LCD anyway.

// comment out following line to print clear time on lcd.
//sprintf(my_array, “Time: %d:%d:%d”, hours, minutes, seconds);
// Print a message to the LCD.
lcd.backlight();
lcd.setCursor(0,0);
//lcd.print(my_array); // comment out for 24 hours time to print on lcd.
lcd.print(“Time “);
if (hours T1157193020209
// T1124154091014
seconds = (byte) ((Serial.read() 48) * 10 + (Serial.read() 48)); // Use of (byte) type casting and ascii math to achieve result.
minutes = (byte) ((Serial.read() 48) *10 + (Serial.read() 48));
hours = (byte) ((Serial.read() 48) *10 + (Serial.read() 48));
day = (byte) (Serial.read() 48);
date = (byte) ((Serial.read() 48) *10 + (Serial.read() 48));
month = (byte) ((Serial.read() 48) *10 + (Serial.read() 48));
year = (byte) ((Serial.read() 48) *10 + (Serial.read() 48));
Wire.beginTransmission(DS3231_I2C_ADDRESS);
Wire.write(0x00);
Wire.write(decToBcd(seconds));
Wire.write(decToBcd(minutes));
Wire.write(decToBcd(hours));
Wire.write(decToBcd(day));
Wire.write(decToBcd(date));
Wire.write(decToBcd(month));
Wire.write(decToBcd(year));
Wire.endTransmission();
>
void get3231Date()
<
// send request to receive data starting at register 0
Wire.beginTransmission(DS3231_I2C_ADDRESS); // 104 is DS3231 device address
Wire.write(0x00); // start at register 0
Wire.endTransmission();
Wire.requestFrom(DS3231_I2C_ADDRESS, 7); // request seven bytes
if(Wire.available()) <
seconds = Wire.read(); // get seconds
minutes = Wire.read(); // get minutes
hours = Wire.read(); // get hours
day = Wire.read();
date = Wire.read();
month = Wire.read(); //temp month
year = Wire.read();
seconds = (((seconds B11110000)4)*10 + (seconds B00001111)); // convert BCD to decimal
minutes = (((minutes B11110000)4)*10 + (minutes B00001111)); // convert BCD to decimal
hours = (((hours B00110000)4)*10 + (hours B00001111)); // convert BCD to decimal (assume 24 hour mode)
day = (day B00000111); // 1-7
date = (((date B00110000)4)*10 + (date B00001111)); // 1-31
month = (((month B00010000)4)*10 + (month B00001111)); //msb7 is century overflow
year = (((year B11110000)4)*10 + (year B00001111));
>
else <
//oh noes, no data!
>
switch (day) <
case 1:
strcpy(weekDay, “Sun”);
break;
case 2:
strcpy(weekDay, “Mon”);
break;
case 3:
strcpy(weekDay, “Tue”);
break;
case 4:
strcpy(weekDay, “Wed”);
break;
case 5:
strcpy(weekDay, “Thu”);
break;
case 6:
strcpy(weekDay, “Fri”);
break;
case 7:
strcpy(weekDay, “Sat”);
break;
>
case 1:
strcpy(monthName, “Jan”);
break;
case 2:
strcpy(monthName, “Feb”);
break;
case 3:
strcpy(monthName, “Mar”);
break;
case 4:
strcpy(monthName, “Apr”);
break;
case 5:
strcpy(monthName, “May”);
break;
case 6:
strcpy(monthName, “Jun”);
break;
case 7:
strcpy(monthName, “Jul”);
break;
case 8:
strcpy(monthName, “Aug”);
break;
case 9:
strcpy(monthName, “Sep”);
break;
case 10:
strcpy(monthName, “Oct”);
break;
case 11:
strcpy(monthName, “Nov”);
break;
case 12:
strcpy(monthName, “Dec”);
break;
>
/* float get3231Temp()
<
float temp3231;
//temp registers (11h-12h) get updated automatically every 64s
Wire.beginTransmission(DS3231_I2C_ADDRESS);
Wire.write(0x11);
Wire.endTransmission();
Wire.requestFrom(DS3231_I2C_ADDRESS, 2);
if(Wire.available()) <
tMSB = Wire.read(); //2’s complement int portion
tLSB = Wire.read(); //fraction portion
temp3231 = (tMSB B01111111); //do 2’s math on Tmsb
temp3231 += ( (tLSB 6) * 0.25 ); //only care about bits 7 8
>
else <
//oh noes, no data!
>
Well its didn’t appeared entire code.
Below is complete code.
#include // For the i2c devices
#include // For the LCD
LiquidCrystal_I2C lcd(0x27,16,2); // set the LCD address to 0x27 for a 16 chars and 2 line display
#define DS3231_I2C_ADDRESS 104 // RTC is connected, address is Hex68 (Decimal 104)
// SCL pin A5
// SDA pin A4
// To set the clock, run the sketch and use the serial monitor.
// Enter T1124154091014; the code will read this and set the clock. See the code for full details.
//
byte seconds, minutes, hours, day, date, month, year;
char monthName[4];
char weekDay[4];
//byte tMSB, tLSB;
//float my_temp;
//char my_array[100]; // Character array for printing something.
void setup()
<
Wire.begin();
Serial.begin(9600);
lcd.init(); // initialize the lcd
>
void loop()
<
watchConsole();
get3231Date();
/*Serial.print(weekDay);
Serial.print(“, “);
Serial.print(date, DEC);
Serial.print(“/”);
Serial.print(month, DEC);
Serial.print(“/”);
Serial.print(year, DEC);
Serial.print(” “);
Serial.print(hours, DEC);
Serial.print(“:”);
Serial.print(minutes, DEC);
Serial.print(“:”);
Serial.print(seconds, DEC);
Serial.print(” Temp: “);
Serial.println(my_temp);
*/
// NOTE: Arduino does NOT implement printing floats to a string.
// If you use the std C function : sprintf(my_array, “Temp: %4.2f”, my_temp), It will NOT CONVERT.
// So I abandoned this, since I don’t need to print the float to the LCD anyway.
// comment out following line to print clear time on lcd.
//sprintf(my_array, “Time: %d:%d:%d”, hours, minutes, seconds);
// Print a message to the LCD.
lcd.backlight();
lcd.setCursor(0,0);
//lcd.print(my_array); // comment out for 24 hours time to print on lcd.
lcd.print(“Time “);
if (hours T1157193020209
// T1124154091014
seconds = (byte) ((Serial.read() 48) * 10 + (Serial.read() 48)); // Use of (byte) type casting and ascii math to achieve result.
minutes = (byte) ((Serial.read() 48) *10 + (Serial.read() 48));
hours = (byte) ((Serial.read() 48) *10 + (Serial.read() 48));
day = (byte) (Serial.read() 48);
date = (byte) ((Serial.read() 48) *10 + (Serial.read() 48));
month = (byte) ((Serial.read() 48) *10 + (Serial.read() 48));
year = (byte) ((Serial.read() 48) *10 + (Serial.read() 48));
Wire.beginTransmission(DS3231_I2C_ADDRESS);
Wire.write(0x00);
Wire.write(decToBcd(seconds));
Wire.write(decToBcd(minutes));
Wire.write(decToBcd(hours));
Wire.write(decToBcd(day));
Wire.write(decToBcd(date));
Wire.write(decToBcd(month));
Wire.write(decToBcd(year));
Wire.endTransmission();
>
void get3231Date()
<
// send request to receive data starting at register 0
Wire.beginTransmission(DS3231_I2C_ADDRESS); // 104 is DS3231 device address
Wire.write(0x00); // start at register 0
Wire.endTransmission();
Wire.requestFrom(DS3231_I2C_ADDRESS, 7); // request seven bytes
if(Wire.available()) <
seconds = Wire.read(); // get seconds
minutes = Wire.read(); // get minutes
hours = Wire.read(); // get hours
day = Wire.read();
date = Wire.read();
month = Wire.read(); //temp month
year = Wire.read();
seconds = (((seconds B11110000)4)*10 + (seconds B00001111)); // convert BCD to decimal
minutes = (((minutes B11110000)4)*10 + (minutes B00001111)); // convert BCD to decimal
hours = (((hours B00110000)4)*10 + (hours B00001111)); // convert BCD to decimal (assume 24 hour mode)
day = (day B00000111); // 1-7
date = (((date B00110000)4)*10 + (date B00001111)); // 1-31
month = (((month B00010000)4)*10 + (month B00001111)); //msb7 is century overflow
year = (((year B11110000)4)*10 + (year B00001111));
>
else <
//oh noes, no data!
>
switch (day) <
case 1:
strcpy(weekDay, “Sun”);
break;
case 2:
strcpy(weekDay, “Mon”);
break;
case 3:
strcpy(weekDay, “Tue”);
break;
case 4:
strcpy(weekDay, “Wed”);
break;
case 5:
strcpy(weekDay, “Thu”);
break;
case 6:
strcpy(weekDay, “Fri”);
break;
case 7:
strcpy(weekDay, “Sat”);
break;
>
case 1:
strcpy(monthName, “Jan”);
break;
case 2:
strcpy(monthName, “Feb”);
break;
case 3:
strcpy(monthName, “Mar”);
break;
case 4:
strcpy(monthName, “Apr”);
break;
case 5:
strcpy(monthName, “May”);
break;
case 6:
strcpy(monthName, “Jun”);
break;
case 7:
strcpy(monthName, “Jul”);
break;
case 8:
strcpy(monthName, “Aug”);
break;
case 9:
strcpy(monthName, “Sep”);
break;
case 10:
strcpy(monthName, “Oct”);
break;
case 11:
strcpy(monthName, “Nov”);
break;
case 12:
strcpy(monthName, “Dec”);
break;
>
/* float get3231Temp()
<
float temp3231;
//temp registers (11h-12h) get updated automatically every 64s
Wire.beginTransmission(DS3231_I2C_ADDRESS);
Wire.write(0x11);
Wire.endTransmission();
Wire.requestFrom(DS3231_I2C_ADDRESS, 2);
if(Wire.available()) <
tMSB = Wire.read(); //2’s complement int portion
tLSB = Wire.read(); //fraction portion
temp3231 = (tMSB B01111111); //do 2’s math on Tmsb
temp3231 += ( (tLSB 6) * 0.25 ); //only care about bits 7 8
>
else <
//oh noes, no data!
>
What? Its weird not showing complete code trimming lcd.print part given below.
// Print a message to the LCD.
lcd.backlight();
lcd.setCursor(0,0);
//lcd.print(my_array); // comment out for 24 hours time to print on lcd.
lcd.print(“Time “);
if (hours=12) // put this in comment for 24 hours time to print on lcd.
<
lcd.print(hours, DEC); // put this in comment for 24 hours time to print on lcd.
lcd.print(:); // put this in comment for 24 hours time to print on lcd.
lcd.print(minutes, DEC); // put this in comment for 24 hours time to print on lcd.
lcd.print(:); // put this in comment for 24 hours time to print on lcd.
lcd.print(seconds, DEC); // put this in comment for 24 hours time to print on lcd.
lcd.print( ); // put this in comment for 24 hours time to print on lcd.
lcd.setCursor(14,0); // put this in comment for 24 hours time to print on lcd.
lcd.print(AM); // put this in comment for 24 hours time to print on lcd.
> else < // put this in comment for 24 hours time to print on lcd.
lcd.print((hours-12), DEC); // change (hours-12) to hours for 24 hours time to print on lcd.
lcd.print(:);
lcd.print(minutes, DEC);
lcd.print(:);
lcd.print(seconds, DEC);
lcd.print( );
lcd.setCursor(14,0);
lcd.print(PM); // put this in comment for 24 hours time to print on lcd.
>
lcd.setCursor(0,1);
lcd.print(weekDay);
lcd.print(, );
lcd.print(date, DEC);
lcd.print(-);
//lcd.print(month, DEC);
lcd.print(monthName);
lcd.print(-20);
lcd.print(year, DEC);
delay(1000);
>
// Convert normal decimal numbers to binary coded decimal
byte decToBcd(byte val)
<
return ( (val/10*16) + (val%10) );
>
Источник: