


How to Flash NodeMCU Firmware
Содержание
- Breakout Board Used
- Find out the NodeMCU serial port in use
- ESP8266 Flash Downloader
- Download pyflasher to install nodeMCU firmware
- Get a nodeMCU firmware Cloud Built Binary
- Programming the ESP8266 using pyflasher
- Testing the LUA interface
- A Simple ESP8266 LUA Example
- Controlling a GPIO pin using LUA
- LED Connection
This Tutorial shows you how to flash the new nodeMCU firmware into a ESP8266. This is also useful to get back to the LUA interface if you were uploading C/C++sketches using the Arduino IDE — which overwrites nodeMCU lua data.
This tutorial shows you how download and flash the latest version — since Feb 2019 some older library code has been deprecated — especially timer operation so its best to get going with the new code rather than learn outdated methods.
This information allows you to switch between Lua scripting and Arduino IDE programming easily — just by reprogramming the ESP8266.
installing Lua on an ESP8266 will allow you to use the LUA scripting language in an interactive terminal. This means code upload is far faster than the Arduino IDE compile-link-upload process.
Although scripting languages are slower the processor is fast (which compensates for scripting speed) and you don’t wait around for an upload as you do with the ESP8266 Arduino IDE — and Arduino IDE uploading takes about a minute so making small frequent changes is a pain.
With scripting — upload is a few seconds and you’re done. The only disadvantage is that its not C so you’re going to have to learn something a bit different. The main difference is that in Lua you use event driven programming.
Breakout Board Used
The board used for experiments here is the Lolin NodeMCU V3 which has a very convenient USB interface that allows you to plug it into a PC — power is supplied from the USB port — but you will need up to 300mA
400mA (depending on the WiFi activity!) so don’t use a hub (unless it has a good power source), use a PC USB port or you might need an external power source.
NodeMCU firmware Update program

This is the easy-to use ESP8266 breakout board
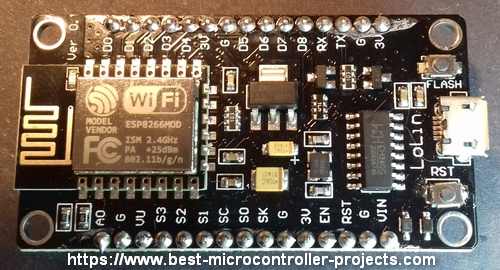
Lolin nodeMCU V3 Board
Note: Other boards such as the ESP-01 and those without a USB interface require you to keep GPIO0 low for programming. The Lolin nodeMCU board however has this pin controlled using outputs from the USB serial chip — so its all automatic — just plug in and flash the firmware.
External Power Source
You can add an external power source to the Vin connection on the board with voltage >5V. Also connect ground labelled ‘G’ to complete the circuit.
Find out the NodeMCU serial port in use

Reading the documents at : https://nodemcu.readthedocs.io/en/master/en/flash/
Says the following:
flash-mode is qio for most ESP8266 ESP-01/07 (512 kByte modules) and dio for most ESP32 and ESP8266 ESP-12 (>=4 MByte modules). ESP8285 requires dout.
ESP8266 Flash Downloader
Download pyflasher to install nodeMCU firmware
Download the following tool:

This will download the pyflasher that is python based but you won’t need to install other files just double click and go.
The downloaded filename is : NodeMCU-PyFlasher-4.0-x64.exe
It looks like this:
Get a nodeMCU firmware Cloud Built Binary
Before you can use pyflasher go and get a binary sent to your email account (for the default settings this takes
2 minutes). It sounds a bit intimidating but the steps are easy — there’s only a few and its not that hard.
Visit this page.
. and keep the default options — at the moment only the ESP8266 is supported and that’s what’s in the nodeMCU board so that’s fine. Enter your email, click the "Start Your Build" button and wait for the binary. Here’s what the options look like:

Note: You can see the functions available for each module by clicking on the book symbols next to each check box.
The idea is to include those you need since space is limited on the ESP8266.
Programming the ESP8266 using pyflasher
Again don’t forget to close the ESP8266 serial port you may have been using!
Download the float version of your binary — this is recommended even though it uses more memory but is up to you.
- Keep the serial speed at 115200.
- Choose the serial port or use auto detect.
- Choose DIO for ESP-12E
- Choose Erase Flash — just to make sure!
Click "Flash NodeMCU":

Note: When you start the serial terminal this Lua interface uses 115200 baud not the 9600 as the previous version used.
This is the output you will see — not just one line as for the 2015 version of nodeMCU:

The above screen is from the ESPlorer terminal.
Testing the LUA interface
Type a command into the lua interface (Serial terminal):
it will respond with:
Note: this is all interactive — there was no compiling a C source file and waiting for upload.
A Simple ESP8266 LUA Example
Controlling a GPIO pin using LUA
LED Current calculation
If you don’t want to add an external LED use pin 4. Current schematics don’t show it but I found it by accident. LED operation is inverted, for this pin, since it is pulled high so digital write low sets the LED on.
Note: Some people do not use a resistor in series with the LED but that is relying on the max current from the nodeMCU as 12mA — other boards will allow more current out (and blow up the LED) so it is best practice to use a resistor — when you forget which board you are using!
I use a 1k since you can see the LED even with that high value. For this case current = (3.3-2)/1k = 1.3mA — you can se it so it is good enough for testing
The usual case is to use a 330R resistor in a 5 volt system. In that case you get (5-2)/330=10mA.
LEDs can usually take 20mA so choosing 10mA for a 3V system gives R= (3.3-2)/10e-3 129R so 120R would do.
LED Connection
Connect an LED and resistor on a breadboard to D0.
LED Round side to D0
LED flat side (look closely) to resistor
other end of resistor to Ground (G).
Type the following commands:
You can see the LED turning on and off using the interactive Lua script interface.
Источник: