


How to Cache Content in NGINX
NGINX being a consolidated open-source, high-performance web server that speeds up content and application delivery, enhances security, and improve scalability. One of the most common use cases of Nginx is a Content Caching, which is the most effective way to boost the performance of a website.
You can use NGINX to accelerate local origin servers by configuring it to cache responses from upstream servers and also to create edge servers for content delivery networks (CDNs). NGINX powers some of the largest CDNs.
When configured as a cache, NGINX will:
- cache static and dynamic content.
- improve dynamic content performance with micro-caching.
- serve stale content while revalidating in the background for better performance.
- override or set Cache-Control headers, and more.
In this article, you will learn how to configure NGINX as a Content Caching in Linux to make your web servers run as efficiently as possible.
Prerequisites:
You should have NGINX installed on your Linux server, if not follow these guides to install Nginx:
Cache Static Content on Nginx
Static content is content of a website that remains the same (does not change) across pages. Examples of static content include files such as images, videos, documents; CSS files, and JavaScript files.
If your website makes use of a lot of static content, then you can optimize its performance by enabling client-side caching where the browser stores copies of static content for faster access.
The following sample configuration is a good go, just replace www.example.com with the URL of your website name and make modifications to other pathnames as appropriate.
Cache Dynamic Content on Nginx
NGINX uses a persistent disk-based cache located somewhere in the local file system. So start by creating the local disk directory for storing cached content.
# mkdir -p /var/cache/nginx
Next, set the appropriate ownership on the cache directory. It should be owned by the NGINX user (nginx) and group (nginx) as follows.
Now proceed further to see how to enable dynamic content on Nginx in the below section.
Enabling FastCGI Cache in NGINX
FastCGI (or FCGI) is a widely-used protocol for interfacing interactive applications such as PHP with web servers such as NGINX. It is an extension of the CGI (Common Gateway Interface).
The main advantage of FCGI is that it manages multiple CGI requests in a single process. Without it, the webserver has to open a new process (that has to be controlled, process a request, and get closed) for every client request for a service.
To process PHP scripts in a LEMP stack deployment, NGINX uses FPM (FastCGI Process Manager) or PHP-FPM, a popular alternative PHP FastCGI implementation. Once the PHP-FPM process is running, NGINX is configured to proxy requests to it for processing. Thus NGINX can also be configured to cache responses from the PHP-FPM backend application server.
Under NGINX, the FastCGI content cache is declared using a directive called fastcgi_cache_path in the top-level http<> context, within the NGINX configuration structure. You can also add the fastcgi_cache_key which defines a key (request identifier) for caching.
Besides, to read the upstream cache status, add the add_header X-Cache-Status directive within the http<> context this is useful for debugging purposes.
Assuming your site’s server block configuration file is located at /etc/nginx/conf.d/testapp.conf or /etc/nginx/sites-available/testapp.conf (under Ubuntu and its derivatives), open the file of editing and add the following lines at the top of the file.
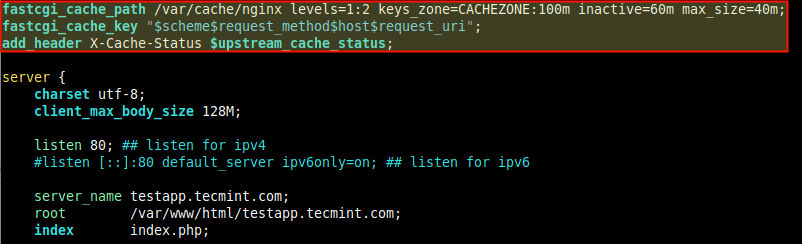
The fastcgi_cache_path directive specifies the number of parameters which are:
- /var/cache/nginx the path to the local disk directory for the cache.
- levels defines the hierarchy levels of a cache, it sets up a two-level directory hierarchy under /var/cache/nginx.
- keys_zone (name:size) enables the creation of a shared memory zone where all active keys and information about data (meta) are stored. Note that storing the keys in memory speeds up the checking process, by making it easier for NGINX to determine whether its a MISS or HIT, without checking the status on disk.
- inactive specifies the amount of time after which cached data that are not accessed during the time specified get deleted from the cache regardless of their freshness. A value of 60m in our example configuration means files not accessed after 60 will get removed from the cache.
- max_size specifies the maximum size of the cache. There are more parameters you can use here (read the NGINX documentation for more information).
The variables in the fastcgi_cache_key directive is described below.
NGINX uses them in calculating the key (identifier) of a request. Importantly, to send a cached response to the client, the request must have the same key as a cached response.
- $scheme request scheme, HTTP or HTTPS.
- $request_method request method, usually “GET” or “POST”.
- $host this can be hostname from the request line, or hostname from the “Host” request header field, or the server name matching a request, in the order of precedence.
- $request_uri means the full original request URI (with arguments).
Also, the $upstream_cache_status variable in the add_header X-Cache-Status directive is calculated for each request that NGINX responds to, whether it is a MISS (response not found in the cache, got from application server) or a HIT (response served from cache) or any of the other supported values.
Next, within the location directive which passes PHP requests to PHP-FPM, uses the fastcgi_cache directives to activate the cache you have just defined above.

Also set caching time for different responses using the fastcgi_cache_valid directive as shown.
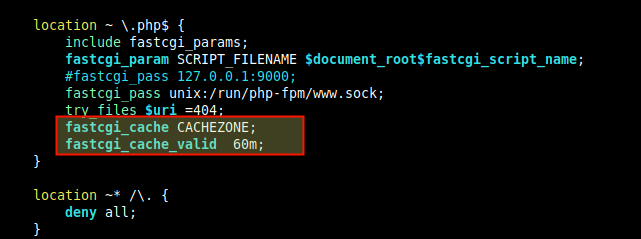
If only caching time is specified as in our case, only 200, 301, and 302 responses are cached. But you can also specify the responses explicitly or use any (for any response code):
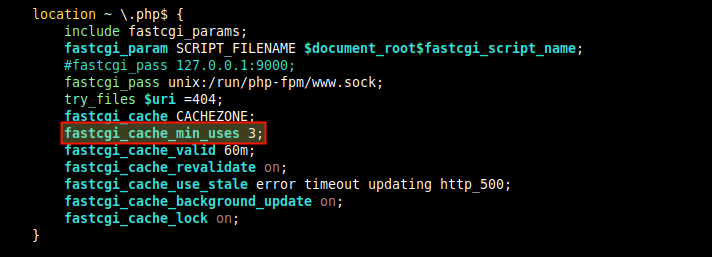
Fine-Tuning FastCGI Caching Performance on Nginx
To set the minimum number of times a request with the same key must be made before the response is cached, include the fastcgi_cache_min_uses directive, either in the http<> or server<> or location<> context.
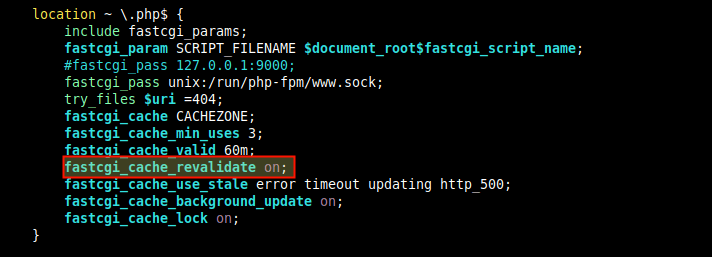
To enable re-validation of expired cache items using conditional requests with the “If-Modified-Since” and “If-None-Match” header fields, add the fastcgi_cache_revalidate directive, within the http<> or server<> or location<> context.
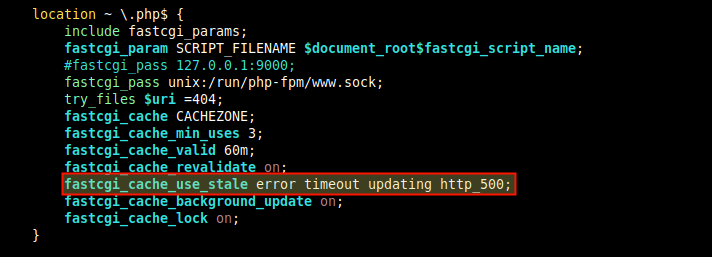
You can also instruct NGINX to deliver cached content when the origin server or FCGI server is down, using the proxy_cache_use_stale directive, within the location directive.
This sample configuration means that when NGINX receives an error, timeout, and any of the specified errors from the upstream server and has a stale version of the requested file in the cached content, it delivers the stale file.
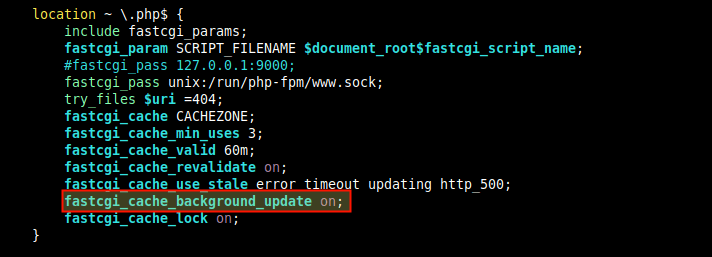
Another useful directive to fine-tune FCGI caching performance is fastcgi_cache_background_update which works in conjunction with the proxy_cache_use_stale directive. When set to on, it instructs NGINX to serve stale content when clients request for a file that is expired or is in the process of being updated from the upstream server.
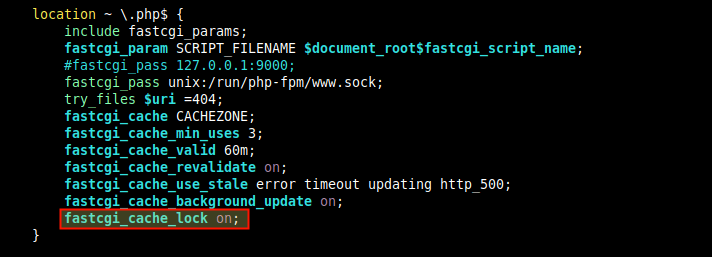
The fastcgi_cache_lock is useful too, for cache performance fine-tuning in that if multiple clients request for the same content that is not in the cache, NGINX will forward only the first request to the upstream server, cache the response then serve the other client requests from the cache.
After making all the above changes in the NGINX configuration file, save and close it. Then check the configuration structure for any syntax errors before restarting the NGINX service.

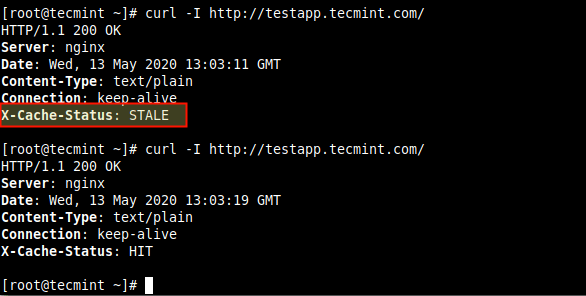
Next, test if the cache is functioning properly, try to access your web application or site from using the following curl command (the first time should indicate a MISS, but subsequent requests should indicate a HIT as shown in the screenshot).

Here is another screenshot showing NGINX serving stale data.
Adding Exceptions to Bypass Cache
It is possible to set conditions under which NGINX should not send cached responses to clients, using the fastcgi_cache_bypass directive. And to instruct NGINX not to cache responses from the upstream server at all, use the fastcgi_no_cache .
For example, if you want POST requests and URLs with a query string to always go to PHP. First, declare an if statement to set the condition as follows.
Then activate the above exception in the location directive which passes PHP requests to PHP-FPM, using the fastcgi_cache_bypass and fastcgi_no_cache directives.
There are many other parts of your site for which you may not want to enable content caching. The following is an example NGINX configuration for improving the performance of a WordPress site, provided on the nginx.com blog.
To use it, make changes (such as the domain, paths, filenames, etc.) to reflect what exists in your environment.
Enabling Proxy Cache in NGINX
NGINX also supports the caching of responses from other proxied servers (defined by the proxy_pass directive). For this test case, we are using NGINX as a reverse proxy for a Node.js web application, so we will enable NGINX as a cache for the Node.js application. All the configuration directives used here have similar meanings as the FastCGI directives in the previous section, so we will not explain them again.
To enable caching of responses from a proxied server, include the proxy_cache_path directive in the top-level http<> context. To specify how requests are cached, you can also add the proxy_cache_key directive as follows.
Next, activate the cache in the location directive.
To define conditions under which NGINX does not send cached content and does not cache a response at all from the upstream server, include the proxy_cache_bypass and proxy_no_cache .
Fine-Tuning Proxy Cache Performance
The following directives are useful for fine-tuning the performance of the proxy cache. They also have the same meanings as the FastCGI directives.
For more information and caching configuration directives, see the documentation for the two main modules ngx_http_fastcgi_module and ngx_http_proxy_module.
If You Appreciate What We Do Here On TecMint, You Should Consider:
TecMint is the fastest growing and most trusted community site for any kind of Linux Articles, Guides and Books on the web. Millions of people visit TecMint! to search or browse the thousands of published articles available FREELY to all.
If you like what you are reading, please consider buying us a coffee ( or 2 ) as a token of appreciation.
Источник: