


Ntp centos 7
In this tutorial, I am going to show you, NTP installation and configuration on CentOS 7 and RHEL 7. We will configure automatically synchronize time with the closest geographically peers available for our server location by using NTP Public Pool Time Servers list. So let’s start.
What is NTP?
NTP stand for Network Time Protocol. NTP is used for clock synchronization between computers system over networks. It’s run over port 123 UDP at Transport Layer.
NTP service installation and configuration
NTP service package is provided by default from official CentOS7 /RHEL7 repositories and we can install by yum with following command.
You can see here our NTP service has been successfully installed.
We can select NTP Pool Server list from pool ntp site
After successfully NTP service installation, We need to go to official NTP Public Pool Time Servers, choose your continent area where the server physically is located, then search for your country location after that you can see NTP servers list for selected country. Like this:-

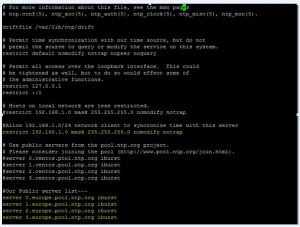
After NTP server selection, we have to edit our NTP service configuration file. You can find NTP configuration file on this path:- /etc/ntp.conf. So let’s start NTP configuration. First of all we have to comment the default list of Public Servers from pool.ntp.org project and replace it with the list provided for your country like below configuration in bold:-
Here is our public NTP Server has been configured in ntp.conf file.
Now we need to add our network which we want to allow
Now we need to allow clients from our networks to synchronize time with our server. To accomplish this, we need to add the following line to NTP configuration file, where restrict statement controls, Here we can define network, which Network we want to allowed to query and sync time – replace network IPs accordingly. Like this:-
The nomodify notrap statements suggest that your clients are not allowed to configure the server or be used as peers for time sync.
NTP service Logs enable
If you want to additional information for troubleshooting in case there is any issue with your NTP service then you can add a log file statement which will allow to record all NTP server logs into one dedicated log file. You can add log file /var/log/ntp.log at the end of ntp.conf file. Like this:-
NTP Server Configuration has been completed
After all above mandatory configuration changes, we can save ntp.conf file. Our final configuration should be look like this in the below screenshot. In below yellow line is our final configuration.
We need to add Firewall Rules for NTP service
NTP service uses UDP port 123 on OSI transport layer (layer 4). We can run this below commands to open 123 port on RHEL7 / CentOS 7 against Firewalld service.

Now port has been successfully open from system firewall.
Now we need to enable and start our NTP server.
After that we can start NTP server and make sure ntpd server should be enable at the server boot time. So once your server will restart, NTP server automatically start. You can use below commands to start the ntpd service and enable ntpd service at the boot time.
You can see here our NTP server has been successfully start.
Now we can Verify NTP Server Time Sync
After NTP server has been successfully started, wait a few minutes for the server to synchronize time with its pool list servers, then run the following commands to verify NTP peers synchronization status and your system time.
Here you can see NTP Time Sync successfully.
If you want to query and synchronize against a pool of your choice use ntpdate command, followed by the server or servers addresses, as suggested in the following command line example.
Synchronize NTP Time has been done with NTP pool server.
Check with timedatectl command
You can also check with timedatectl command and your NTP enabled and NTP synchronized should be yes on your NTP server look like this:-
If your NTP synchronized is no then you have to enable with below commands. First you have stop your NTP server and then you have to try to enable NTP synchronized once this enabled you have to start NTP service. Like this:-
Now our NTP server has been successfully installed and configured.
Configure NTP Client on Windows Machine.
Now we are going to configure our Windows to synchronize time with our NTP server. Go to Time from the right side of Taskbar — Change Date and Time Settings — Internet Time tab — Change Settings — Check Synchronize with an Internet time server — put your server’s IP or FQDN on Server filed — Update now — OK.
After that our windows will be sync with our NTP server.
Configure NTP Client on Linux server
Now I am going to show you how to configure NTP client on Linux7 and CentOS7. We need to install ntp package on client as like NTP server.
After package installation we need to add NTP server IP in /etc/ntp.conf file like this:-
After that we need to enable and start our ntp service on NTP client. Like this:-
Now you have to check with timedatectl command and your output will be look like below. If there is any different you can perform above NTP server timedateclt steps to correct it.
After that you can see you client date automatically sync with your NTP server.
That’s all we have completed NTP server and NTP Client installation and Configuration.
You can also check with below link how to configure DNS on CentOS 7 and RHEL 7
Источник: