


Interfacing Nokia 5110 LCD with Arduino
Содержание
First, we will simply show some data on the screen. In the second example, we will show DHT22 sensor data on the LCD.
- 48,230 views
- 3 comments
- 19 respects
Components and supplies
Apps and online services
About this project
In this article, we are going to interface the Nokia 5110 LCD with Arduino. You will learn the Nokia 5110 Arduino interfacing with the help of two examples. First, we will simply show some data on the screen and in the second example; we will read from the DHT22 temperature and humidity sensor and will show the readings on the Nokia 5110 LCD screen.
The Nokia 5110 LCD is a great choice when it comes to display data. It is cheaper and very easy to use with the micro-controllers. You just have to connect some wires and you are ready to go.
For Custom Projects, hire me at https://www.freelancer.com/u/Muhammadaqibdutt
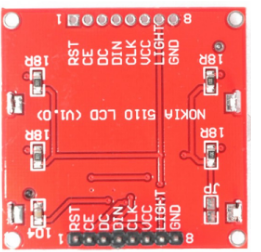
Before going into the examples, first take a look at the pin out of the Nokia 5110 LCD.
The pin out of the Nokia 5110 LCD is as follows
RST: Reset Pin
SCE: chip select Pin
D/C: (Data/Command): This is the mode select pin. Low means command mode and high means Data mode.
DN (Data Pin): Serial Data In
SCLK: Serial Clock
VCC: Input voltage is from 2.7 to 3.3V
LED: This LED is the backlight LED. Input voltage is 3.3V
GND: Ground
Required Components For this Tutorial
The required components for the Nokia 5110 Arduino are as follows
- Nokia 5110 LCD
- Arduino Uno
- DHT22 temperature and Humidity Sensor
- 1K potentiometer
- 4 X 10K resistors
- 1K resistor
- 330 ohm resistor
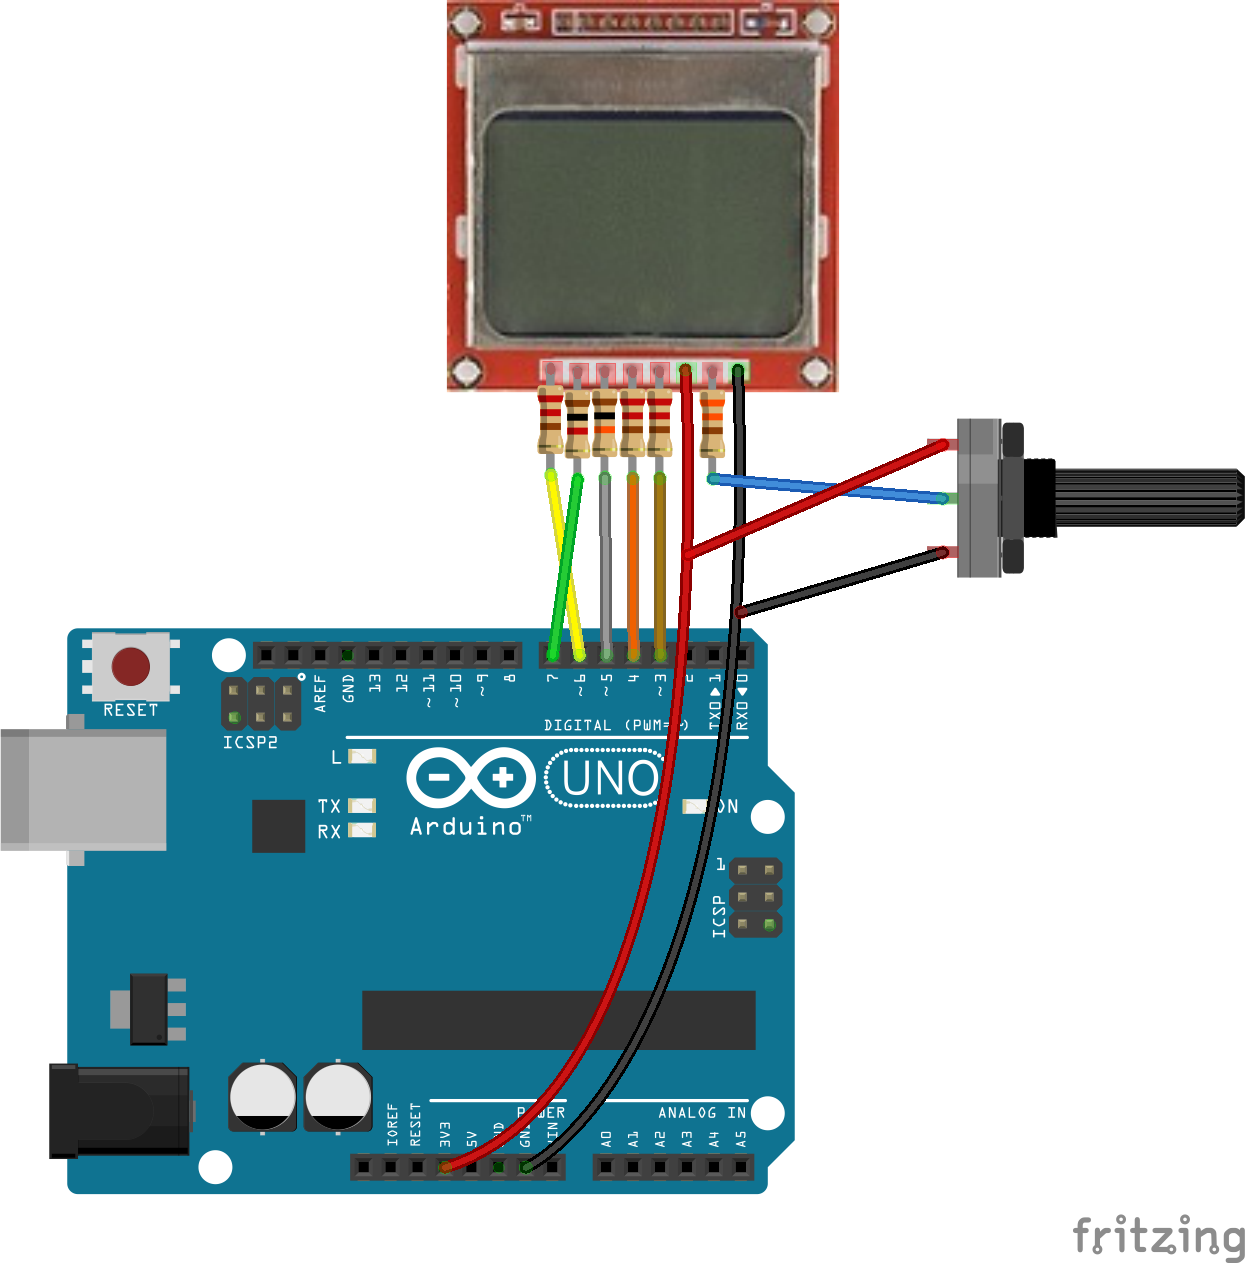
In the first example, we will simply print the data on the Nokia 5110 LCD. The circuit diagram for Nokia 5110 Arduino interfacing is shown below. The Nokia 5110 LCD requires 3.3V to operate, so we will have to use resistors to convert the 5V into 3.3V. If you will operate the Nokia 5110 Arduino without the resistors, then it will work but the life span of the LCD will decrease.
- Connect the pin 1 (RST Pin) to the pin 6 of Arduino through the 10K resistor.
- Connect the pin 2 (SCE Pin) to the pin 7 of Arduino through the 1K resistor.
- Connect the pin 3 (D/C Pin) to the pin 5 of Arduino through the 10K resistor.
- Connect the pin 4 (DIN Pin) to the pin 4 of Arduino through the 10K resistor.
- Connect the pin 5 (CLK Pin) to the pin 3 of Arduino through the 10K resistor.
- Connect the pin 6 (VCC Pin) to the 3.3V pin of Arduino.
- Connect the pin 7 (LED Pin) to the middle pin of 1k potentiometer through 330 ohm resistor and connect the other two pins to the VCC and the ground.
- Connect the pin 8 (GND Pin) to the GND of Arduino.

The potentiometer connected is used to increase or decrease the backlight of the LCD. You can connect it to 3.3V, if you want the backlight to always high or you can connect it to ground if you do not want backlight.
Download the Nokia 5110 library from the following link
First of all, we have included the library for the Nokia 5110 LCD. The library will include all the commands that we will require for the Nokia 5110 LCD. Then, we have declared a variable named ‘lcd’ of type PCD8544.
Then in the setup function, we have set the resolution for the Nokia 5110 LCD. The Nokia5110 LCD has 84X48 resolutions, so we have set the 84X48 resolution in the Arduino IDE.
Then in the loop function, first we have set the cursor at first line and printed the ‘Welcome there’. Then we moved to second line and printed ‘To’ there and then on the third line, we printed ‘ElectronicsHobbyists.com’.
In the second example, we will connect the DHT22 temperature and humidity sensor with the Arduino and will read the temperature, humidity and the heat index using the DHT22. Then we will show these on the Nokia 5110 LCD.
The circuit diagram for Nokia 5110 Arduino and DHT22 interfacing is as below
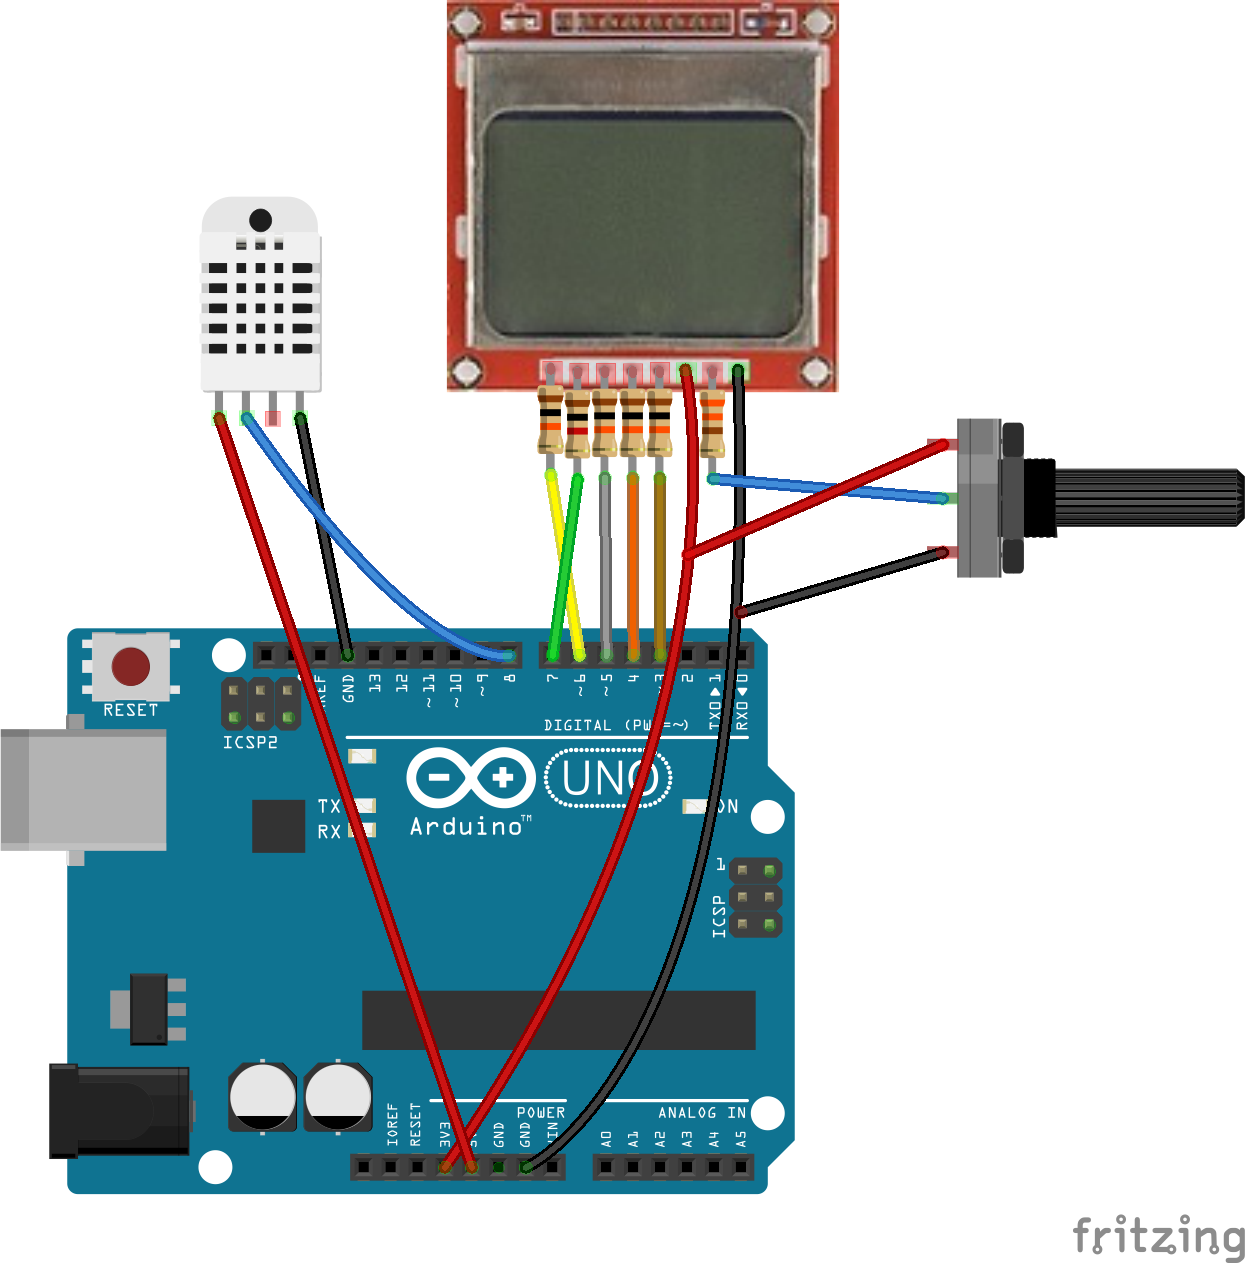
The connections of the Nokia 5110 LCD with Arduino are explained in the first example. Connect the pins of the DHT22 sensor with the Arduino as below
- Pin 1 of DHT22 to 5V of Arduino.
- Pin 2 of DHT22 to pin 8 of Arduino.
- Pin 4 of DHT22 to GND pin of Arduino.
If you want to read more about the DHT interfacing with Arduino, then read this tutorial |Temperature and Humidity Sensor DHT22 Arduino Interfacing
Download the Nokia 5110 LCD and DHT22 library from the following link
First of all, we have included the libraries for the Nokia 5110 LCD and the DHT22 temperature and humidity sensor. After that, we have initialized pin 8 for the DHT22 (DHTPIN 8) and have define the type of DHT sensor. There are also other models of DHT sensors available but we have used the DHT22 because of its high accuracy. Then, we declared a variable ‘lcd’ of type PCD8544 for the LCD and a variable ‘dht’ of type DHT for the DHT22 sensor.
Then in the setup function, we have set the resolution of the for the Nokia 5110 LCD. The Nokia5110 LCD has 84X48 resolutions, so we have set the 84X48 resolution in the Arduino IDE. After that, we started to receive data from the DHT22 sensor by using the ‘dht.begin()’ command.
In the loop function, we read the values of the humidity, temperature and heat index from the DHT22 and stored in the variables. In the end, we printed these on the Nokia 5110 LCD screen.
If you have any questions, then feel free to ask us in the comment section.
Источник: