


Karadio32 схема
Содержание
esp32 version of Ka-Radio (https://github.com/karawin/Ka-Radio) by jp Cocatrix
Latest commit
Git stats
Files
Failed to load latest commit information.
README.md
Release 1.9 Stable
Works on any esp32 board.
See the boards directory for a list of pre-configured boards.
See : Hardware configuration partition
- The esp32 adds the output on the internal dac or with i2s to an external dac but only mp3 stations can be played.
Adding a vs1053 board, all stations can be played.
On a wrover cpu with external psram, every AAC streams can be played without the vs1053 board. - Compatible with esp8266 KaRadio addons.
- Serial or telnet commands : Interfaces description
Android remote command
A new android application is born:
- KaRadio Remote Control by Vassilis Serasidis on google Play.
It is an easy and fast WiFi remote control for your KaRadio or KaRadio32 hardware.
With this android app you can select the WebRadio station you want to play, set the volume and get the station information such as Station name, Genre, Bit rate, Meta data and more.
Found it at https://play.google.com/store/apps/details?id=com.serasidis.karadio.rc
The facebook group
Added features from KaRadio
Work with i2s, internal DAC or a vs1053.
Output mode set in Setting panel on web page of KaraDio32 :
- I2S for connection to an external DAC
- I2SMERUS to connect a merus amplifier
- DAC to use the built in DAC of the esp32
- PDM to output a PDM (Pulse Density Modulation) stream
- VS1053 to connect to a vs1053 board, I2S output of the vs1053 enabled.
- all VS1053 tones control
- AAC decoding on I2S with a wrover cpu (4mB of external psram). Mp3 only on I2S with a wroom cpu.
- https stations are played.
- Interfaces available on serial, telnet and html
- up to 255 editable stations.
- Handles bitrates up to 320 kbps.
- Stations can be saved and restored from html in and from a file.
- Hardware configuration file to adapt the standard delivery to all boards and addons you need.
- all configurable parameters automatically saved.
- mDNS support.
- wrover esp32 support. About 10 seconds of buffering, and soon A2DP support (sink and source)
- Time Zone Offset support.
- Latin, Cyrillic and Greek support on screen.
- 28 types of lcd or oled B/W or Color supported.
- Programmable lcd backlight off timer.
- Touch screen if the hardware supports it.
- Two joysticks (set of two adc buttons), one for volume, one for stations.
- Two max rotary encoders. One for volume priority, one for station change priority.
- Two max set of 3 buttons. One for volume priority, one for station change priority.
- Rotary encoder and set of buttons support included. Common functions : play/stop, volume, station change, date time display.
- ADC keyboard with 6 buttons.
- Date format DD:MM:YYYY or MM:DD:YYYY .
- Remote IR support integrated. Nec protocol only.
- Two configurable access points .
- OTA (Over The Air) update of the software.
- Uses a 40 kB (I2S), 50 kB (vs1053) or 420 Kb (wrover) queue to provide smooth playback.
- many more configurable parameters. See Interfaces document
| CPU | vs1053b | other |
|---|---|---|
| Wroom | mp3 aac ogg | mp3 |
| Wrover | mp3 aac ogg | mp3 aac |
| CPU | vs1053b | other |
|---|---|---|
| Wroom http | 50k | 40k |
| Wroom https | 40k | 25k |
| Wrover http | 400k | 400k |
| Wrover https | 400k | 400k |
Configure the hardware and IR codes
If the default configuration doesn’t fit your needs, you can externally configure the software to fit your hardware and peripherals to suit your needs.
The configuration file is to be flashed only one time. After, the standard delivery will become compatible with your hardware gpio use and peripherals configuration. A future standard OTA will automatically works for your configuration.
See : Hardware configuration partition
For a wrover cpu you need a csv file with psram in the name. Without it, the default configuration will fail.
To build your own release if you want to do some improvments, you must install the idf https://github.com/espressif/esp-idf and the toolchain. The esp-idf release is the 3.3

To flash all build output, run ‘make flash’ or :
The default configuration is given below. It includes an encoder, an IR remote and a LCD or OLED.
To add or edit GPIO definitions and add or remove some devices, you may need a hardware configuration file. Some examples are in the boards directory.
See the file main/include/gpio.h and main/include/addon.h
WARNING: this configuration will not work for a wrover processor. You need an adapted csv configuration.
LCD or oled declaration
You can configure the kind of display used in your configuration with the command
‘sys.lcd("x")’ with x:
- If the access point of your router is not known, the webradio initialize itself as an AP. Connect the wifi of your computer to the ssid "WifiKaRadio",
- Browse to 192.168.4.1 to display the page, got to "setting" "Wifi" and configure your ssid ap, the password if any, the wanted IP or use dhcp if you know how to retrieve the dhcp given ip (terminal or scan of the network).
- In the gateway field, enter the ip address of your router.
- Validate. The equipment restart to the new configuration. Connect your wifi to your AP and browse to the ip given in configuration.
- Congratulation, you can edit your own station list. Don’t forget to save your stations list in case of problem or for new equipments.
- if the AP is already know by the esp32, the default ip is given by dhcp.
- a sample of stations list is on http://karadio.karawin.fr/WebStations.txt . Can be uploaded via the web page.
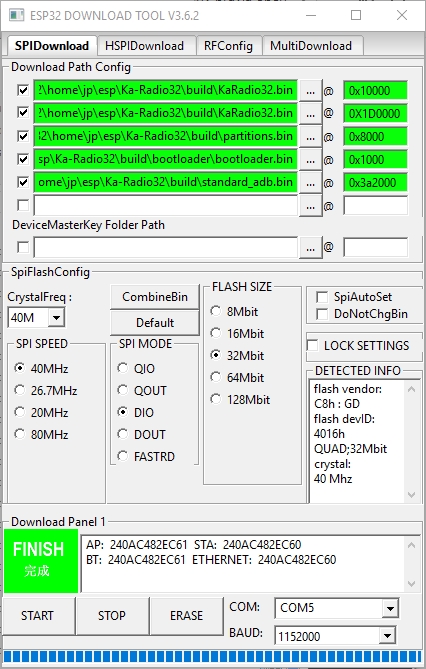
To flash your KaRadio32 without generating it, you will need the files in the binaries directory.
The tool to use is here :
http://espressif.com/en/support/download/other-tools
(change the security of the installation directory to permit all)
See the image at :
http://karadio.karawin.fr/karawin32Flash.jpg
WARNING: the standard_adb.bin must be changed for a wrover processor or another configuration.
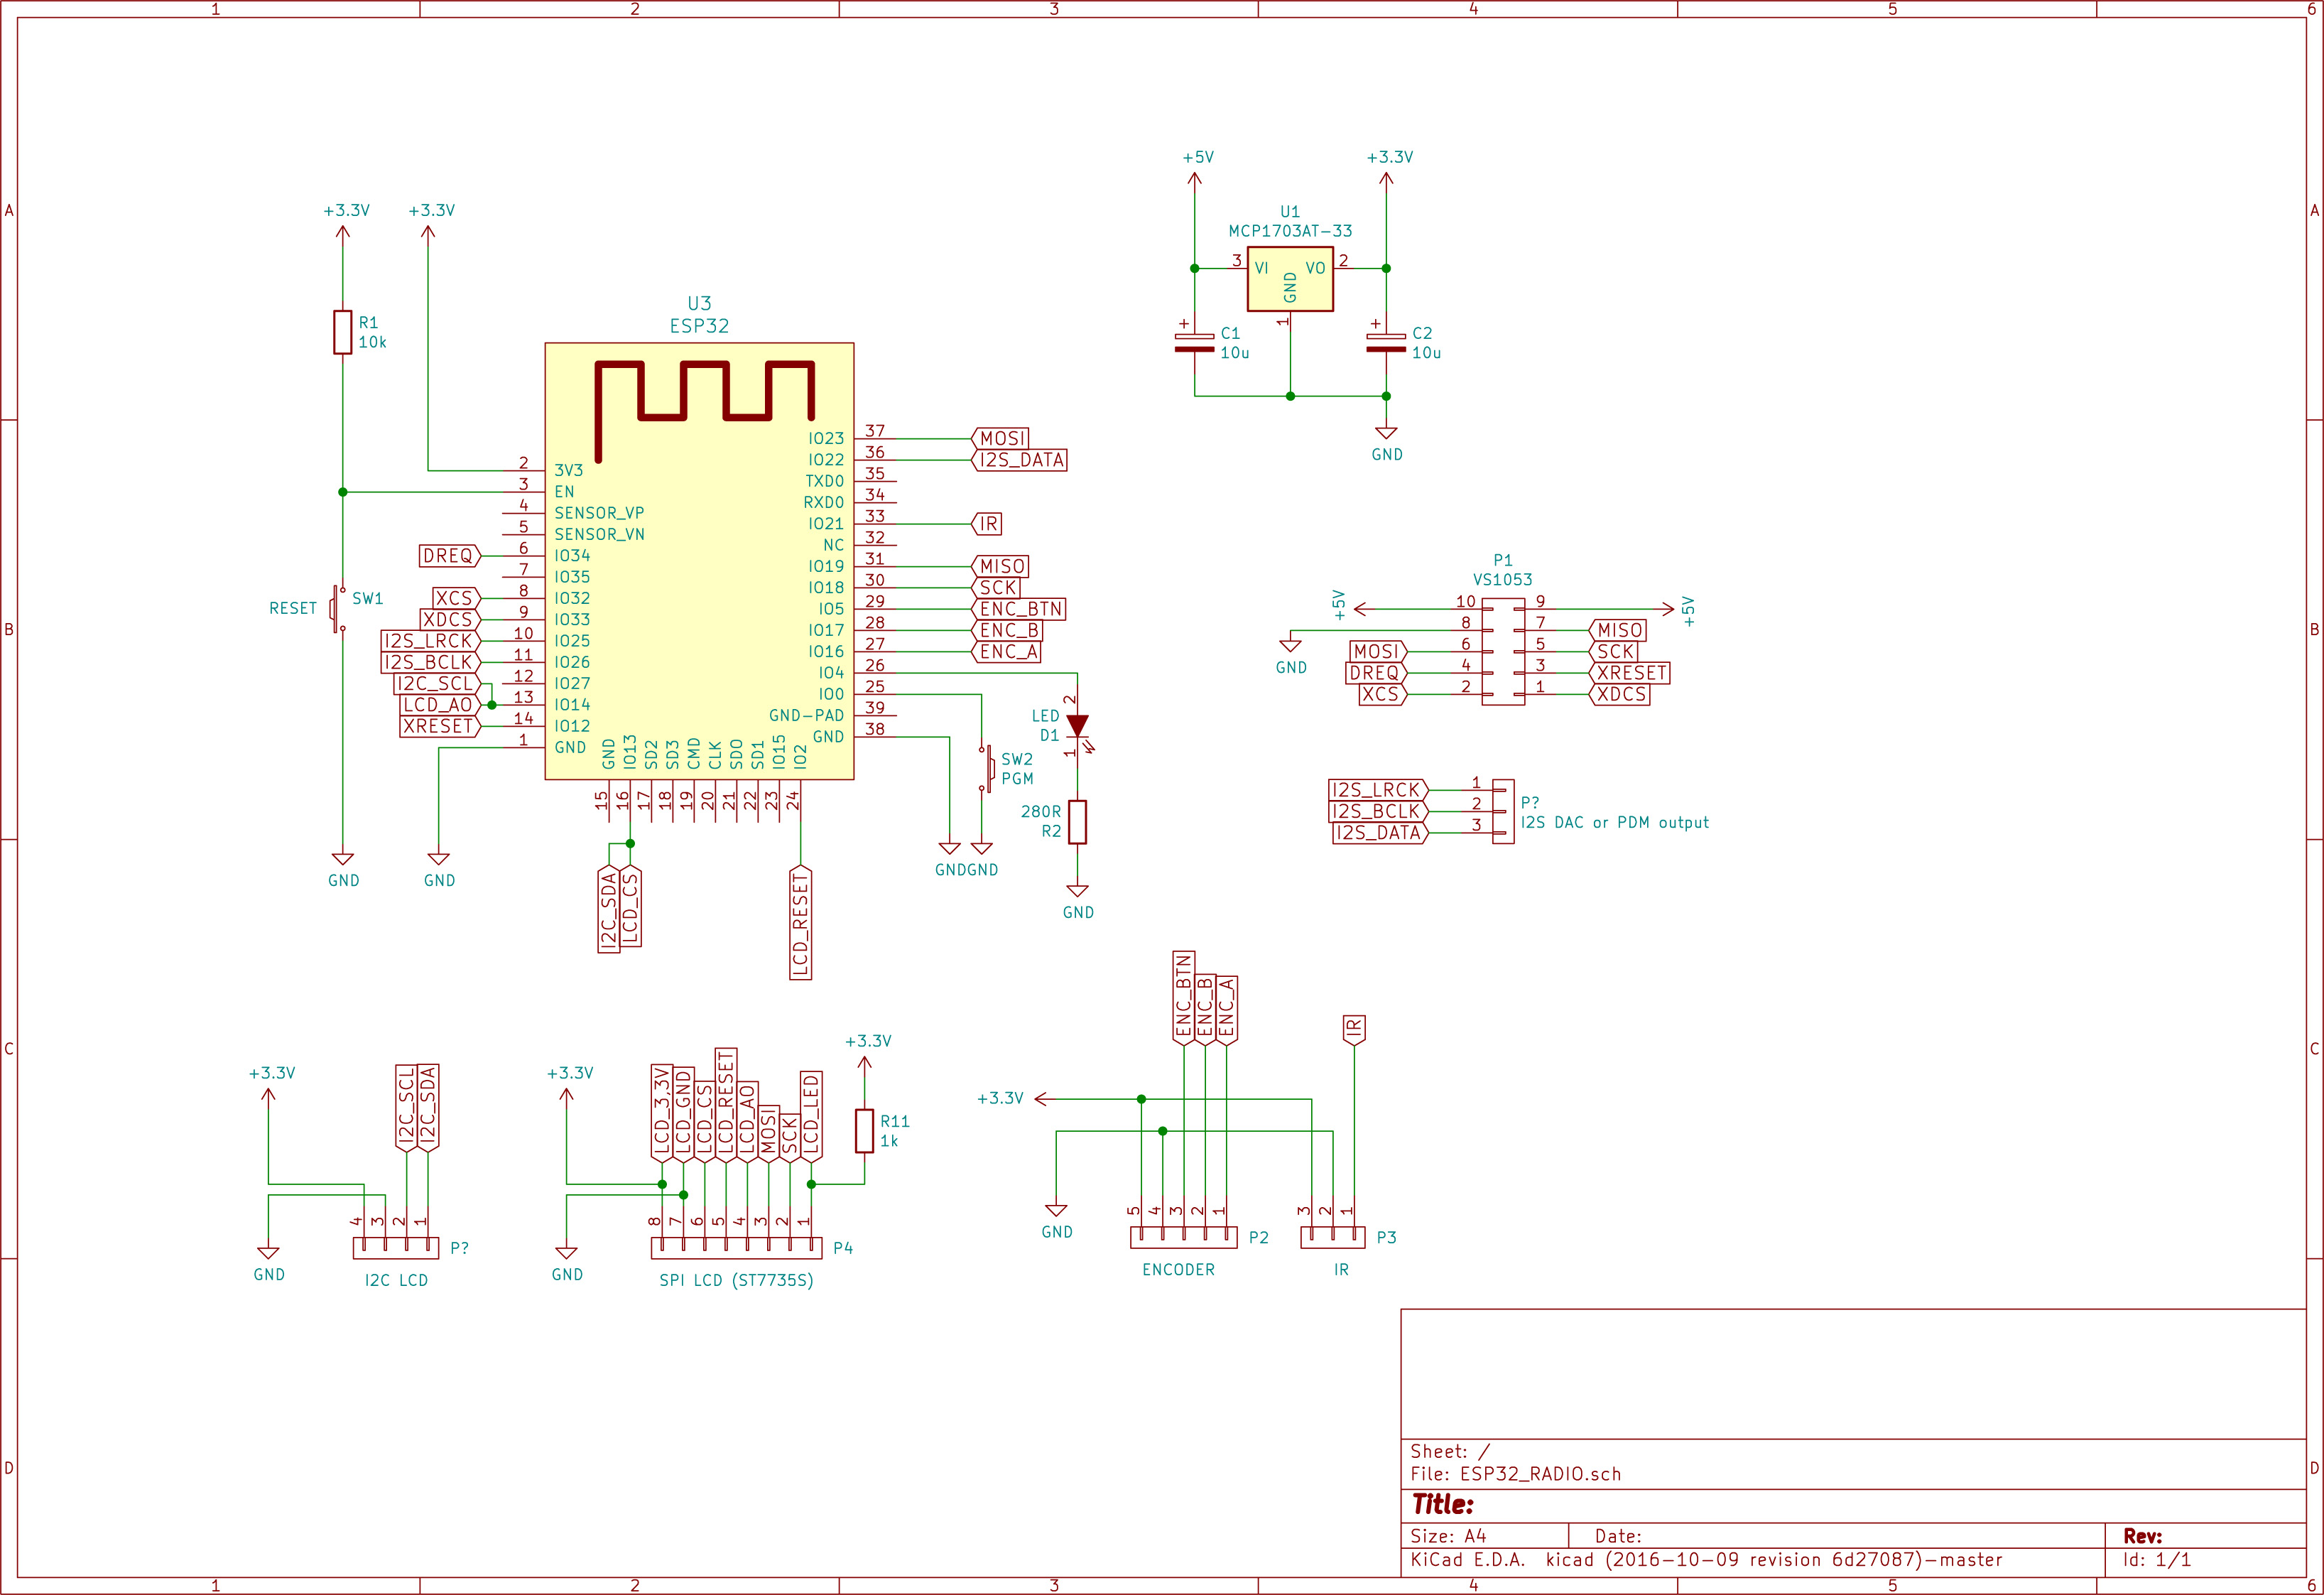
The scheme from tomasf71 :
Just an example of a realization.
In the Setting panel on the webpage of KaraDio32 you can set the desired output method for audio.
For output on a simple speaker or a general analog amplifier :
- DAC to use the built in DAC of the esp32
- PDM to output a PDM (Pulse Density Modulation) stream. Wiki on PDM : https://en.wikipedia.org/wiki/Pulse-density_modulation
For output via addional I2S or VS1053 hardware :
- I2S for connection to ac external DAC
- I2SMERUS to connect a merus amplifier
- VS1053 to connect to a vs1053 board.
Connecting a speaker, earphone or amplifier with DAC or PDM setting
You can connect the GPIO25 (left audio channel), GPIO26 (right audio channel) and Ground directly to a small loudspeaker, a simple earphone (like from an mp3 player) or the input of an analog amplifier. The quality is less perfect than using an I2S or VS1053 board, bit it is very simple hardware-wise.
Connect like this :
Reducing the analog output level
If the audio signal level is too high for your speaker, earphone or amplifier you can add a potentiometer to decrease the level. Connect the potentiometer like this (only pictured for 1 audio channel, for stereo you need 2 potentiometers or a stereo-potmeter.
Improving the audio quality with a filter
An analog DAC signal always has some noise that may cause some distortion on the audio output, especially on low volume passages in the sound. This noise can be decreased with a low-pass filter. The digital PDM signal needs allways low pass filter to convert the digital signal to an analog signal. Fortunately the speaker and earphone acts as a low pass filter, although not in a perfect way.
You can improve the analog signal with an external low-pass filter. A simple low-pass RC filter can be find on the internet, f.i. here :
http://www.pavouk.org/hw/usbdac/en_index.html.
If Karadio32 is configured to use ADC, PDM or I2S output (to an external dac) it can play audio streams in mp3 format. Other formats like AAC and WMV require too much dynamic memories and can not be played this way.
When you want to play other formats you add an external VS1053 decoder to Karadio. Details on the features of this decoder can be found here : http://www.vlsi.fi/en/products/vs1053.html
Handling streaming errors
Normally a radio station is played without interruption.
But when a connection to the server of the radio station is (temporarily) disrupted (due to internet problems or server problems) Karadio behaves as follows:
Источник: