


CentOS: How to Set Date, Time, TimeZone and NTP Synchronization
Содержание
- Hwclock: Hardware Time Configuration
- Manual Time Configuration in CentOS
- How to Set TimeZone in CentOS?
- Configure CentOS to Sync Time with NTP Time Servers
- How to Sync Time in CentOS 8 using Chronyd?
- Common Time Syn Issues in CentOS
In this article, we’ll show you how to set time, date, timezone, synchronize time with an NTP server and fix typical issues in CentOS Linux.
There are two types of clocks on the servers: hardware one (real-time clock) that are working even if a server is off and the operating system software clock. The time on these clocks may differ. After starting the operating system, the software clock is based on a hardware one and may be adjusted by the OS.
Most applications use software clock time in their operation.
Hwclock: Hardware Time Configuration
Hwclock is used to check the hardware time in Linux:
- hwclock —localtime — check hardware time without correction
- hwclock —utc – displays time if the hardware clock shows UTC time
To set hardware time according to the system time, run this command:
# hwclock —systohc
To set the hardware time you want, run the following:
# hwclock —set —date "11 Oct 2020 17:30"

Manual Time Configuration in CentOS
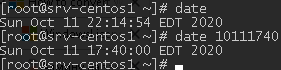
In Linux, date or timedatectl tools are used to check and set software time. If you call date without any parameters, it will show the current time on your server:
If you want to set time manually, you can use date with additional parameters:
To get extended information about the date, time, timezone, synchronization settings, day-light saving time settings (DST), timedatectl is used. It gives more detailed information about time settings on a server.
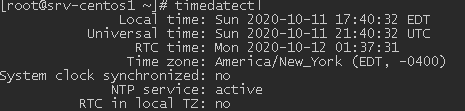
Timedatectl also allows to change time:
# timedatectl set-time ‘2020-10-11 17:51:00’
How to Set TimeZone in CentOS?
To set the time according to your timezone on a CentOS Linux, you can change it manually. To do it, you can use two tools:
- timedatectl
- tzdata
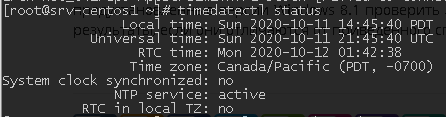
To change a time zone using timedatectl, run this command:
# timedatectl set-timezone Canada/Pacific
# date

Or you can use tzdata. To use this method, replace the file /etc/localtime with the one you need. The entire list of time zones is located in /usr/share/zoneinfo/ directory. Let’s change a timezone to Canada/Pacific. Back up the current locatime file:
# mv /etc/localtime /etc/localtime.bak
Create a symlink to the timezone you want to set:
# ln -s /usr/share/zoneinfo/Canada/Pacific /etc/localtime
Configure CentOS to Sync Time with NTP Time Servers
You can configure automatic time synchronization on your host with an external NTP (Network Time Protocol) server. To do it, you must install the ntp service. For example, you can install it using yum in CentOS 7:

# yum install ntp -y
After the installation, start the ntpd service and add it to startup:
# systemctl start ntpd.service
# systemctl enable ntpd.service
Make sure that the service is running:
# service ntpd status
Specify the NTP servers to synchronize time with in /etc/ntp.conf:
Time is synchronized in turn. If the first NTP server is not available, the second one is used, etc.
You can synchronize time with the specified NTP server manually using this command:
By default, ntpd enables “11 minute mode”. It means that time will be synchronized every 11 minutes. If you cannot use the ntpd daemon, you can configure time synchronization using cron. Add the following command to cron:
How to Sync Time in CentOS 8 using Chronyd?
In CentOS 8 you will have to use chrony to synchronize time, since ntp and ntpdate have been removed from the official repositories.
The main benefits of chrony are:
- High speed and accuracy of time synchronization;
- Proper operation if you don’t have access to master clock (ntpd requires regular requests);
- By default, time is not modified right after the synchronization to prevent any problems for running programs;
- Uses less resources.
By default, chrony is already installed in CentOS Linux, but if you don’t have it on some reason, install it:
# dnf install chrony
Like any other service, chrony needs to be started and added to startup after installation:
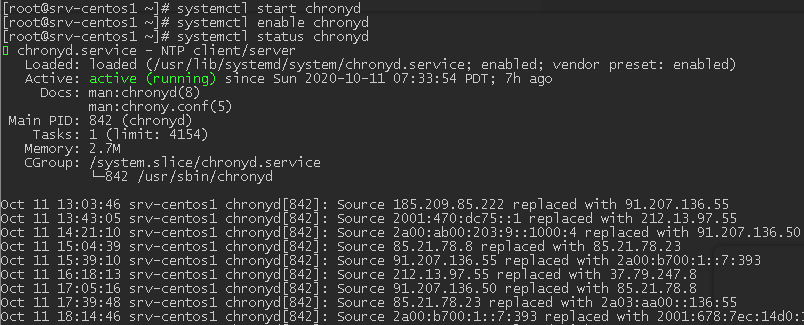
# systemctl start chronyd
# systemctl enable chronyd
Check the chronyd service status:
# systemctl status chronyd
To make sure that the time synchronization is working, run this command:
Chrony configuration file is /etc/chrony.conf. Specify the list of NTP servers you want to use for synchronization. Like ntp, chrony has a command-line interface: chronyc. To view the information about the current time synchronization options, run this command:
To view the information about sync servers:
If you want to set the specific date and time manually, you can use date, but previously disable the chronyd daemon.
Common Time Syn Issues in CentOS
In this section, I will describe typical errors that appear when working with timedatectl, ntp.
During the manual time synchronization you may come across this error:
This means that the ntpd daemon is running and is preventing manual time synchronization. To manually synchronize the time, stop the ntpd daemon:
# service ntpd stop
And run the synchronization again.
The same error may occur when working with timedatectl:
You must disable automatic sync in timedatectl:
# timedatectl set-ntp 0
And run this command to set the time and date you want:
# timedatectl set-time ‘2020-11-12 17:41:00’
When working with time zones, it may occur that they are not installed on your server and you are not able to create a symlink for localtime. To make time zones available on your host, install the tzdata tool:
# yum install tzdata -y
Also, you may face some errors during manual synchronization like the following one:
In this case, check your firewalld/iptables rules and make sure that the UDP Port 123 is open on your server. Also, some NTP hosts may not be available during validation.
Источник: