


Use Mikrotik CAPSMAN to manage all access points and enable roaming
You can use the Mikrotik capsman to manage multiple access points and enable roaming between them. This will ensure that users can roam from one access point to the other without loosing connections. Capsman stands for controlled access point system manager. It allows network administrators to manage multiple Mikrotik access point from a central location.
In this demonstration, I will share with us on how to enable Mikrotik capsman to manage all access points. The steps are easy and straight forward.
Before we go into the configuration of Mikrotik capsman, let us look at the benefits of using capsman to manage your access points.
Benefits of Mikrotik CAPSMAN
1 It allows multiple clients (CAPs) to be upgraded at once.
2 It simplifies the tasks involved in setting up an access point.
Requiremensts for Mikrotik CAPSMaN
1 Any routerOS device with version 6.11 or above. If yours is lower than this version, simply update to current version.
2 CAPSMAN and CAP devices, aslo known as controlled access points, must have routerOS license level 4 or above.
3 To be added to a CAPSMAN, CAP devices must run same version of routerOS as the CAPSMAN.
4 The CAPSMAN does not require a wireless interface to function. However, if your CAPSMAN has a wireless interface, that interface can be configured as a CAP.
Before enabling CAPSMAN on the controller
Before you enable capsman on the controller, do the following:
1 Create a bridge on the controller and plug all cables connecting to access points to the ports assigned to the bridge. If you are using a switch with a single cable connecting the switch to the CAPSMAN, create a bridge and add that interface alone to the bridge
2 Assign an IP to the bridge port (management IP).
3 Configure DHCP server on the bridge. This will assign IP addresses to the CAPs and users connected to the CAPs.
4 Ensure all access points (CAP) are plugged to the bridged ports on the controller or to the switch, if you are using a switch.
5 Login to an access point (CAP), create a bridge and assign both wireless and ethernet interfaces to the bridge. Configure bridge port as a dhcp client to aquire management IP from the DHCP server configured on the controller.
6 Ensure that both the CAPSMAN and all CAPs have access to the internet. Verify by pinging an internet address.
Enable CAPSMAN on the controller
For this demonstration, I am using a Mikrotik RB750 as my controller. I have a Mikrotik RB951Ui, which will serve as my CAP (access point), plugged into it. Both devices have been updated and are now running same version of routerOS with license level 4.
On the CAPSMAN (my RB750)
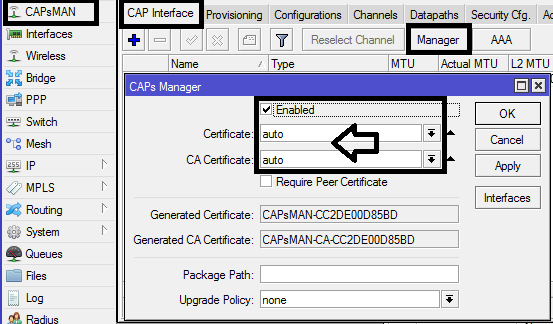
The first thing to do on the CAPSMAN is to enable CAPSMAN. To do this, click on CAPSMAN, click on manager, set certificate and CA certificate to auto, and click on apply and Ok.
Set security profile on the CAPSMAN
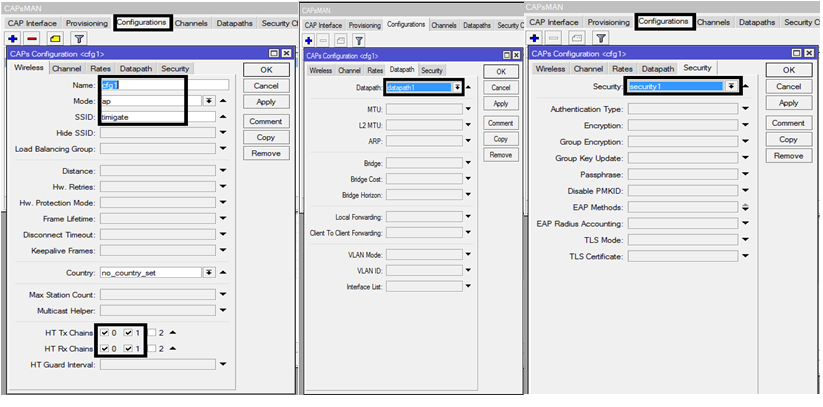
Next, set up the security features that will be pushed out to all controlled access points. These include wireless authentication type, encryption, and passphrase. In the capsman sub-menu, click on the security tab and configure your settings as shown in the image below.

Configure datapath on the CAPSMAN
Datapath is the path data from users connected to controlled access points (CAPs) will travel. It should be configured on the bridge created earlier. The bridge already has a DHCP server that will assign IP addresses to users connected to access points. See the image below for how it is done.


The name can be set to anything.
Setting your channels on the CAPSMAN
After setting your datapath, you need to configure the channels that your access points will operate in. Since there are three non-overlapping channels in the 2.4Ghz spectrum, I will set only three channels. These channels will be used across the access points.

Repeat the steps to create channels 2437 and 2462.
Unify your configuration
After setting up your channels, click on the configuration tab to make use of some of the configurations done so far.
Adding CAPs to CAPSMAN
If you have followed up to this point, you have done everything needed to setup Mikrotik CAPSMAN. The next task is the addition of CAPs to CAPSMAN. It is easy and should not take more than a minute to achieve.
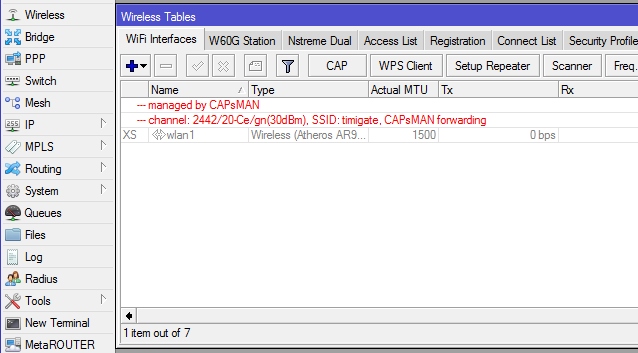
Login to a connected access point (CAP), go to the wireless interface, click on cap and enter details as shown in the image below.

The selected interface is the wireless interface on the access point that should be controlled by CAPSMAN, certificate is request certificate from the CAPSMAN, while the discovery interface is set to the bridge created on the CAP. Remember that the bridge port houses both the ethernet and wireless ports on the access point.
At this point, a message similar to the one shown in the image below will be displayed on the CAP.
Assign channels to CAPs
To ensure that your wireless LAN is free from interference, you are to head back to the CAPSMAN and assign configured channels to all provisioned controlled access points (CAPs). To do this, click on CAPSMAN, on the capsman interface, double-click on a provisioned CAP, click on the channel tab and select a channel from the three configured.

Note that two or more CAPs can use one channel, provided their signals do not overlap. CAPs with overlapping signals should use different channels. This will work perfectly since the configured channels are non-overlapping.
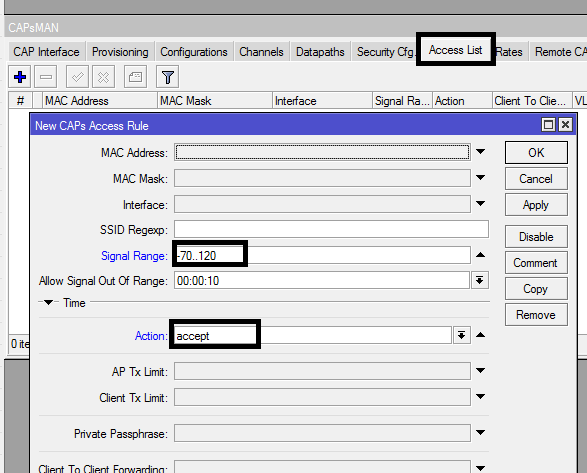
To enable roaming among CAPs, click on the access-list tab on the CAPSMAN and set acceptable signal range as while as the signal range that should be declined. This will ensure that users are authomatically disconnected from one access point and connected to another as they move from one location to another. See image below.

If you followed till this point, congratulations! You did it! Your Mikrotik CAPSMAN should be up and running by now. If did but it isn’t working, don’t sweat it. Simply go over it one more time. If you still can’t get it to work, leave me a comment.
If you enjoyed this tutorial, please subscribe to this blog to receive my posts via email. Also subscibe to my YouTube channel, like my Facebook page and follow me on Twitter.
Источник: