


Bitrix Virtual Appliance
Installation of Bitrix Environment (BitrixEnv) for Linux will be helpful for:
- Users and developers who previously used Bitrix Virtual Appliance product for site preparation and experienced problems when migrating the configuration to host or non-virtual hardware with loss of performance.
- For hosting-partners specialists planning to create different VPS templates for Bitrix products.
- For system administrators requiring fast preparation of high-performance framework for the installation or migration of sites based on Bitrix.
- For programmers and system administrators requiring the fast deployment of a cluster, based on Bitrix.
Bitrix Virtual Environment for Linux provides fast deployment of Bitrix products and solutions to operate with minimal expenses in an optimal environment of CentOS 6/7 (i386, x86_64) Linux-based platform:
- mysql-server 5.*
- web-server (Apache 2.2.*)
- php 5.6/7.0.x
- nginx 1.10.2
- memcached
- stunnel
- catdoc
- xpdf
- munin
- nagios
- sphinx
Below you can find the review of Bitrix Virtual Environment for Linux installation on the equipment with pre-installed CentOS 7 (Minimal) (x86_64).
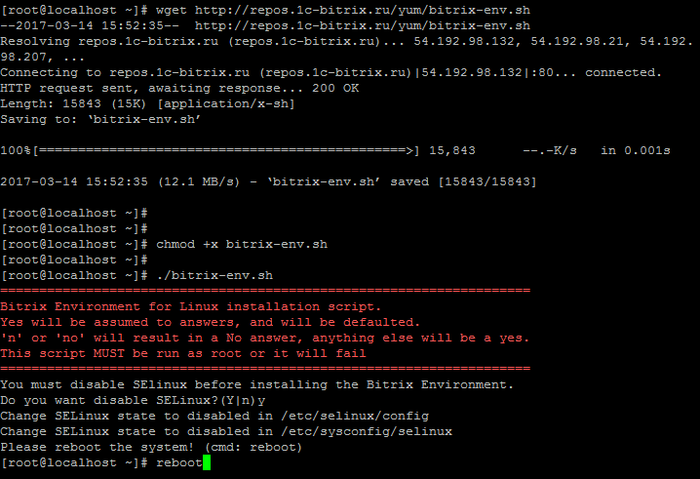
- Get authorized on the server with root administrative account.
- Download the Bitrix Virtual Environment for Linux script and run it via the following commands:
After the server is rebooted, continue the BitrixEnv installation:

- 22 – ssh access;
- 80 / 443 – http / https web-server;
- 8890 / 8891 – http/https ntlm;
- 8893 / 8894 – http/https instant message server;
- 5222 / 5223 – http/https xmpp-server.


- To go console, select 0. Exit in the menu (or press Ctrl+C)
- And then, run the exit command
«Silent» BitrixEnv installation (silent mode)
Starting from Version 7.1, there is an available option to create a pool in silent mode: after BitrixEnv is installed, the pool creation is immediately initiated with the required host name and MySQL root password.
- -s — Silent mode for installation. Don’t ask any questions.
- -p — Create pool after Bitrix Environment is installed.
- -H — Host name for pool creation procedure).
- -F — Used as firewalld.
- -I — Used as iptables firewall (by default).
- -M — MySQL root password (Mysql password for root user).
Example use:
Launch the Bitrix Environment installation in silent mode, create the pool with the ‘server1’ host name and set the MySQL root password — 111111.
How to manage BitrixEnv
To proceed to execution of any action in Virtual Appliance, please input the number and press Enter. For example, to configure virtual server, input 2 in the line (Manage localhost) and press Enter.
To return from the command line (if you have pressed 0. Exit or Ctrl+C) back to the BitrixEnv menu, input the following command in the console:
Handling files in BitrixEnv
Handling files in BitrixEnv is performed using protocols SSH / SFTP. Protocols FTP and SCP are not supported by default.
Источник: