


Arduino Nano Tutorial [Pinout]
Содержание
In this tutorial you learn everything you have to know about the Arduino Nano:
- Technical datasheet
- What is the pinout of the Nano?
- What is the best power supply for this microcontroller?
- How to reduce the Arduino Nano power consumption?
- Advantages and Disadvantages of the Arduino Nano.
- Compare the Nano to other Arduino and ESP8266 based microcontroller.

Table of Contents
Arduino Nano Datasheet
The Arduino Nano is a microcontroller board, based on the ATmega328P microcontroller by Atmel. The Atmega328 comes with built-in bootloader, which makes it very easy to flash the board with your code. Like all Arduino boards, you can program the software running on the board using a language derived from C and C++. The easiest development environment is the Arduino IDE. The Nano is the smallest board of the Arduino boards but has nearly the same datasheet like the Arduino Uno. Only the power jack is missing and instead of a standard USB port the Nano has a Mini-B USB plug.
The following table contains the datasheet of the Arduino Nano R3 microcontroller board:
| Board | Arduino NANO 3 |
|---|---|
| Microcontroller | ATmega328p |
| Processor | AVR 8-bit |
| Operating Voltage | 5V |
| Minimum Operating Voltage | 2.7V |
| Maximum Operating Voltage | 6V |
| Arduino IDE Board | Arduino Nano |
| Power Supply via VIN,VCC | 7V. 12V |
| Digital I/O Pins (with PWM) | 14 (6) |
| Analog Input Pins | 8 |
| Resolution ADC | 10 bit (0. 1023) |
| Analog Output Pins | 0 |
| SPI/I2C/I2S/UART | 1/1/0/1 |
| Max DC Current per I/O Pin | 40 mA |
| Max DC Current per 3V Pin | 50 mA |
| Flash Memory | 32 KB |
| SRAM | 2 KB |
| EEPROM | 1024 bytes |
| Clock Speed | 16 MHz |
| Length x Width | 45mm x 18mm |
| Fits on standard breadboard | yes |
| WIFI | no |
| Bluetooth | no |
| Touch sensor | no |
| CAN | no |
| Ethernet MAC Interface | no |
| Temperature Sensor | no |
| Hall effect sensor | no |
| Power jack | no |
| USB connection | yes |
| Battery Connection | no |
| Programmable | Arduino IDE |
| 5V Voltage Regulator | LM1117IMPX-5.0 |
| Output Voltage | 5V |
| Maximum Input Voltage | 20V |
| Minimum Input Voltage | 7V |
| Maximum Output Current | 800mA |
| Maximum Voltage Dropout | 1.2V @ 800mA |
| Typical Quiescent Current | 5mA |
| 3.3V Voltage Regulator | FT232R USB UART |
| Output Voltage | 3.3V |
| Maximum Input Voltage | 5.25V |
| Minimum Input Voltage | 4.35V |
| Maximum Output Current | 100mA |
| Typical Quiescent Current | 2.5mA |
| Power Consumption @ 9V | |
| Reference Empty Script [mA] | 22.5 |
| Reduce Clock Speed [mA] | 18.5 |
| Low Power Mode [mA] | 4.83 |
| Power Consumption @ 3.3V | |
| Reduce Clock Speed [mA] | 3.41 |
| Low Power Mode [mA] | 3.42 |
Do you want to compare the datasheet of different microcontroller boards like Arduino Uno, Arduino Mega, ESP8266 Node MCU and WeMos D1 Mini? Follow this Link for the comparison.

If you do not already have an Arduino Nano, you can buy one from the following links. I get commissions for purchases made through links in this table.
| Component | Amazon Link | AliExpress Link |
|---|---|---|
| Arduino Nano | Amazon | AliExpress |
Arduino Nano R3 Pinout
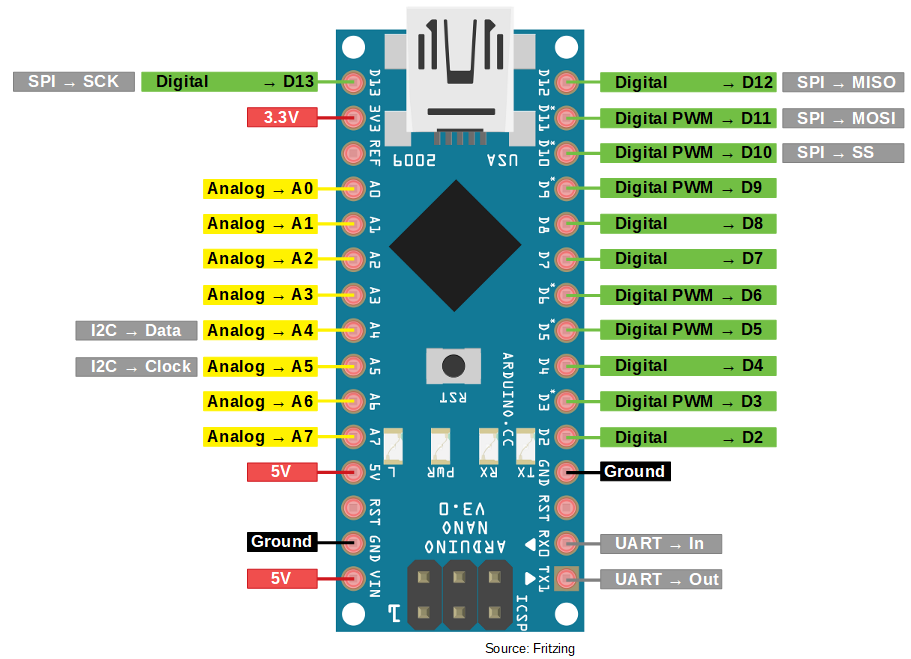
The Arduino Nano is the smallest microcontroller in the Arduino family and has therefore the lowest number of pins and connections. But in my opinion the Nano is very suitable for projects where you do not need a wireless connection.
The Nano has one 3.3V and two 5V power pins of which one is the VIN pin. With the VIN pin you can supply the Arduino Nano with a voltage between 7V-12V to run the microcontroller on battery for example. All three power pins provide a maximum currency of 50 mA. You can close the circuit with two ground pins.
The microcontroller has 8 analog pins with a 10-bit analog-to-digital converter (ADC). The ADC converts the input voltage to a signal between 0 and 1023. There is also the possibility to use the analog pins A0…A5 as output with the function digitalWrite(Ax). Both analog pins A6 and A7 are only analog inputs.
There are in total 14 digital I/O pins which can be used with a maximum currency of 40 mA if you are not using the serial ports RX0 (UART — In) and RX1 (UART — Out) and do not use the Serial.begin() function in your Arduino script. If you use the serial ports, then you have in total 12 digital pins (D2…D13) that can be used like you see in the pinout picture. If you want to create a PWM signal for example to control the speed of a motor, there are 6 of the 13 digital pins, which are PWM ready.
You can use pin 2 and 3 as interrupts if you want to monitor an input during the runtime of the whole Arduino script.
The typical communication standards (SPI, I2C and UART) are also available on the Arduino Nano.
Источник: